Cookie Consent
Set up cookie consent to control when integrations, custom scripts, and telemetry load on your documentation site. Works with any consent management platform (CMP).
Control which integrations and scripts require user consent before loading. When cookie consent is configured, scripts only load after the user accepts the relevant consent category through your consent banner.
This works with any consent management platform (CMP): CookieBot, OneTrust, CookieYes, Osano, Termly, or a custom consent banner.
How it works
-
You add your CMP banner as a custom script, the popup your visitors see
-
You configure consent categories with a key and value; this tells us what cookie to look for
-
When a visitor clicks "Accept", your CMP writes that cookie to the browser
-
Documentation.ai checks the browser for that value: if found, scripts in that category load. If not, they stay blocked.
Integrations and scripts without a consent category always load; only the categories you configure are gated.
Documentation.ai does not include a built-in consent banner. You need to add your CMP's script via Custom Scripts. The cookie consent configuration here only controls when your other scripts and integrations are allowed to load.
Choose your setup
Not every site needs the full cookie consent configuration. Choose the approach that fits your situation:
I use a CMP with auto-blocking (Osano, CookieBot Strict mode)
Some CMPs like Osano and CookieBot (in Strict mode) automatically detect and block third-party scripts at the network level; you don't need to configure anything extra for them to work.
What to do: Add your CMP banner as a custom script. Do not enable the Cookies configuration in Site Config. Your CMP will handle blocking and unblocking scripts on its own.
The only thing your CMP cannot control is Documentation.ai telemetry (our built-in page view tracking). If you need to gate or disable that, see Telemetry below.
I use a CMP without auto-blocking (CookieYes, Termly, custom banner)
Some CMPs only show a consent banner and store the user's choice; they don't block scripts themselves. In this case, you need Documentation.ai's cookie consent configuration to gate your scripts.
What to do: Follow the full setup below: add your CMP script, configure consent categories, and assign categories to your integrations.
I just want to disable Documentation.ai telemetry
If you don't need a consent banner at all but want to turn off our built-in page view tracking, you don't need cookie consent configuration.
What to do: Go to Site Config > Integrations > Telemetry in the Editor and toggle it off. Or add this to documentation.json:
{
  "integrations": {
    "telemetry": { "enabled": "false" }
  }
}
No CMP or cookies setup required.
Prerequisites
-
A documentation project with integrations or custom scripts configured
-
A CMP account (CookieBot, OneTrust, CookieYes, Osano, Termly, etc.) or a custom consent banner script
Step 1: Add your CMP banner script
Your CMP provides a JavaScript snippet or script URL to show the consent banner. Add it as a custom script so it loads on every page.
From the Editor
Get the embed code from your CMP
Log in to your CMP dashboard and copy the JavaScript embed snippet. It typically looks like this:
var script = document.createElement("script");
script.src = "https://consent.cookiebot.com/uc.js?cbid=YOUR_ID";
document.head.appendChild(script);
Create a script file
In the Editor, go to Site Config > Custom Scripts. Click Add Script > Create New Script. Name it something like cmp-banner.js and paste your CMP's embed code into the editor.
Publish
Click Publish. The consent banner will now appear on every page of your documentation site.
Via documentation.json
If your CMP provides a direct script URL, you can reference it as an external URL in documentation.json:
{
  "scripts": [
    { "src": "https://consent.cookiebot.com/uc.js?cbid=YOUR_ID" }
  ]
}
Or if you saved the embed code as a local .js file in your project:
{
  "scripts": [
    { "src": "scripts/cmp-banner.js" }
  ]
}
Scripts without a category field default to essential, which means they always load, exactly what you need for a consent banner. Do not assign a consent category to your CMP script, otherwise the banner itself would be blocked.
Step 2: Configure consent categories
Each consent category maps to a cookie or localStorage key-value pair that your CMP sets when the user accepts that category.
Where do the key and value come from?
You have two options:
Option A: Use your CMP's built-in cookie values. Every CMP writes a specific cookie when a user consents. See the CMP reference section below for the exact key-value pairs for each major provider.
Option B: Configure your CMP to write custom values. Most CMPs let you add custom JavaScript callbacks that run when the user accepts a category. You can set a simple localStorage value like localStorage.setItem('analytics_consent', 'granted') and use that as your key-value pair.
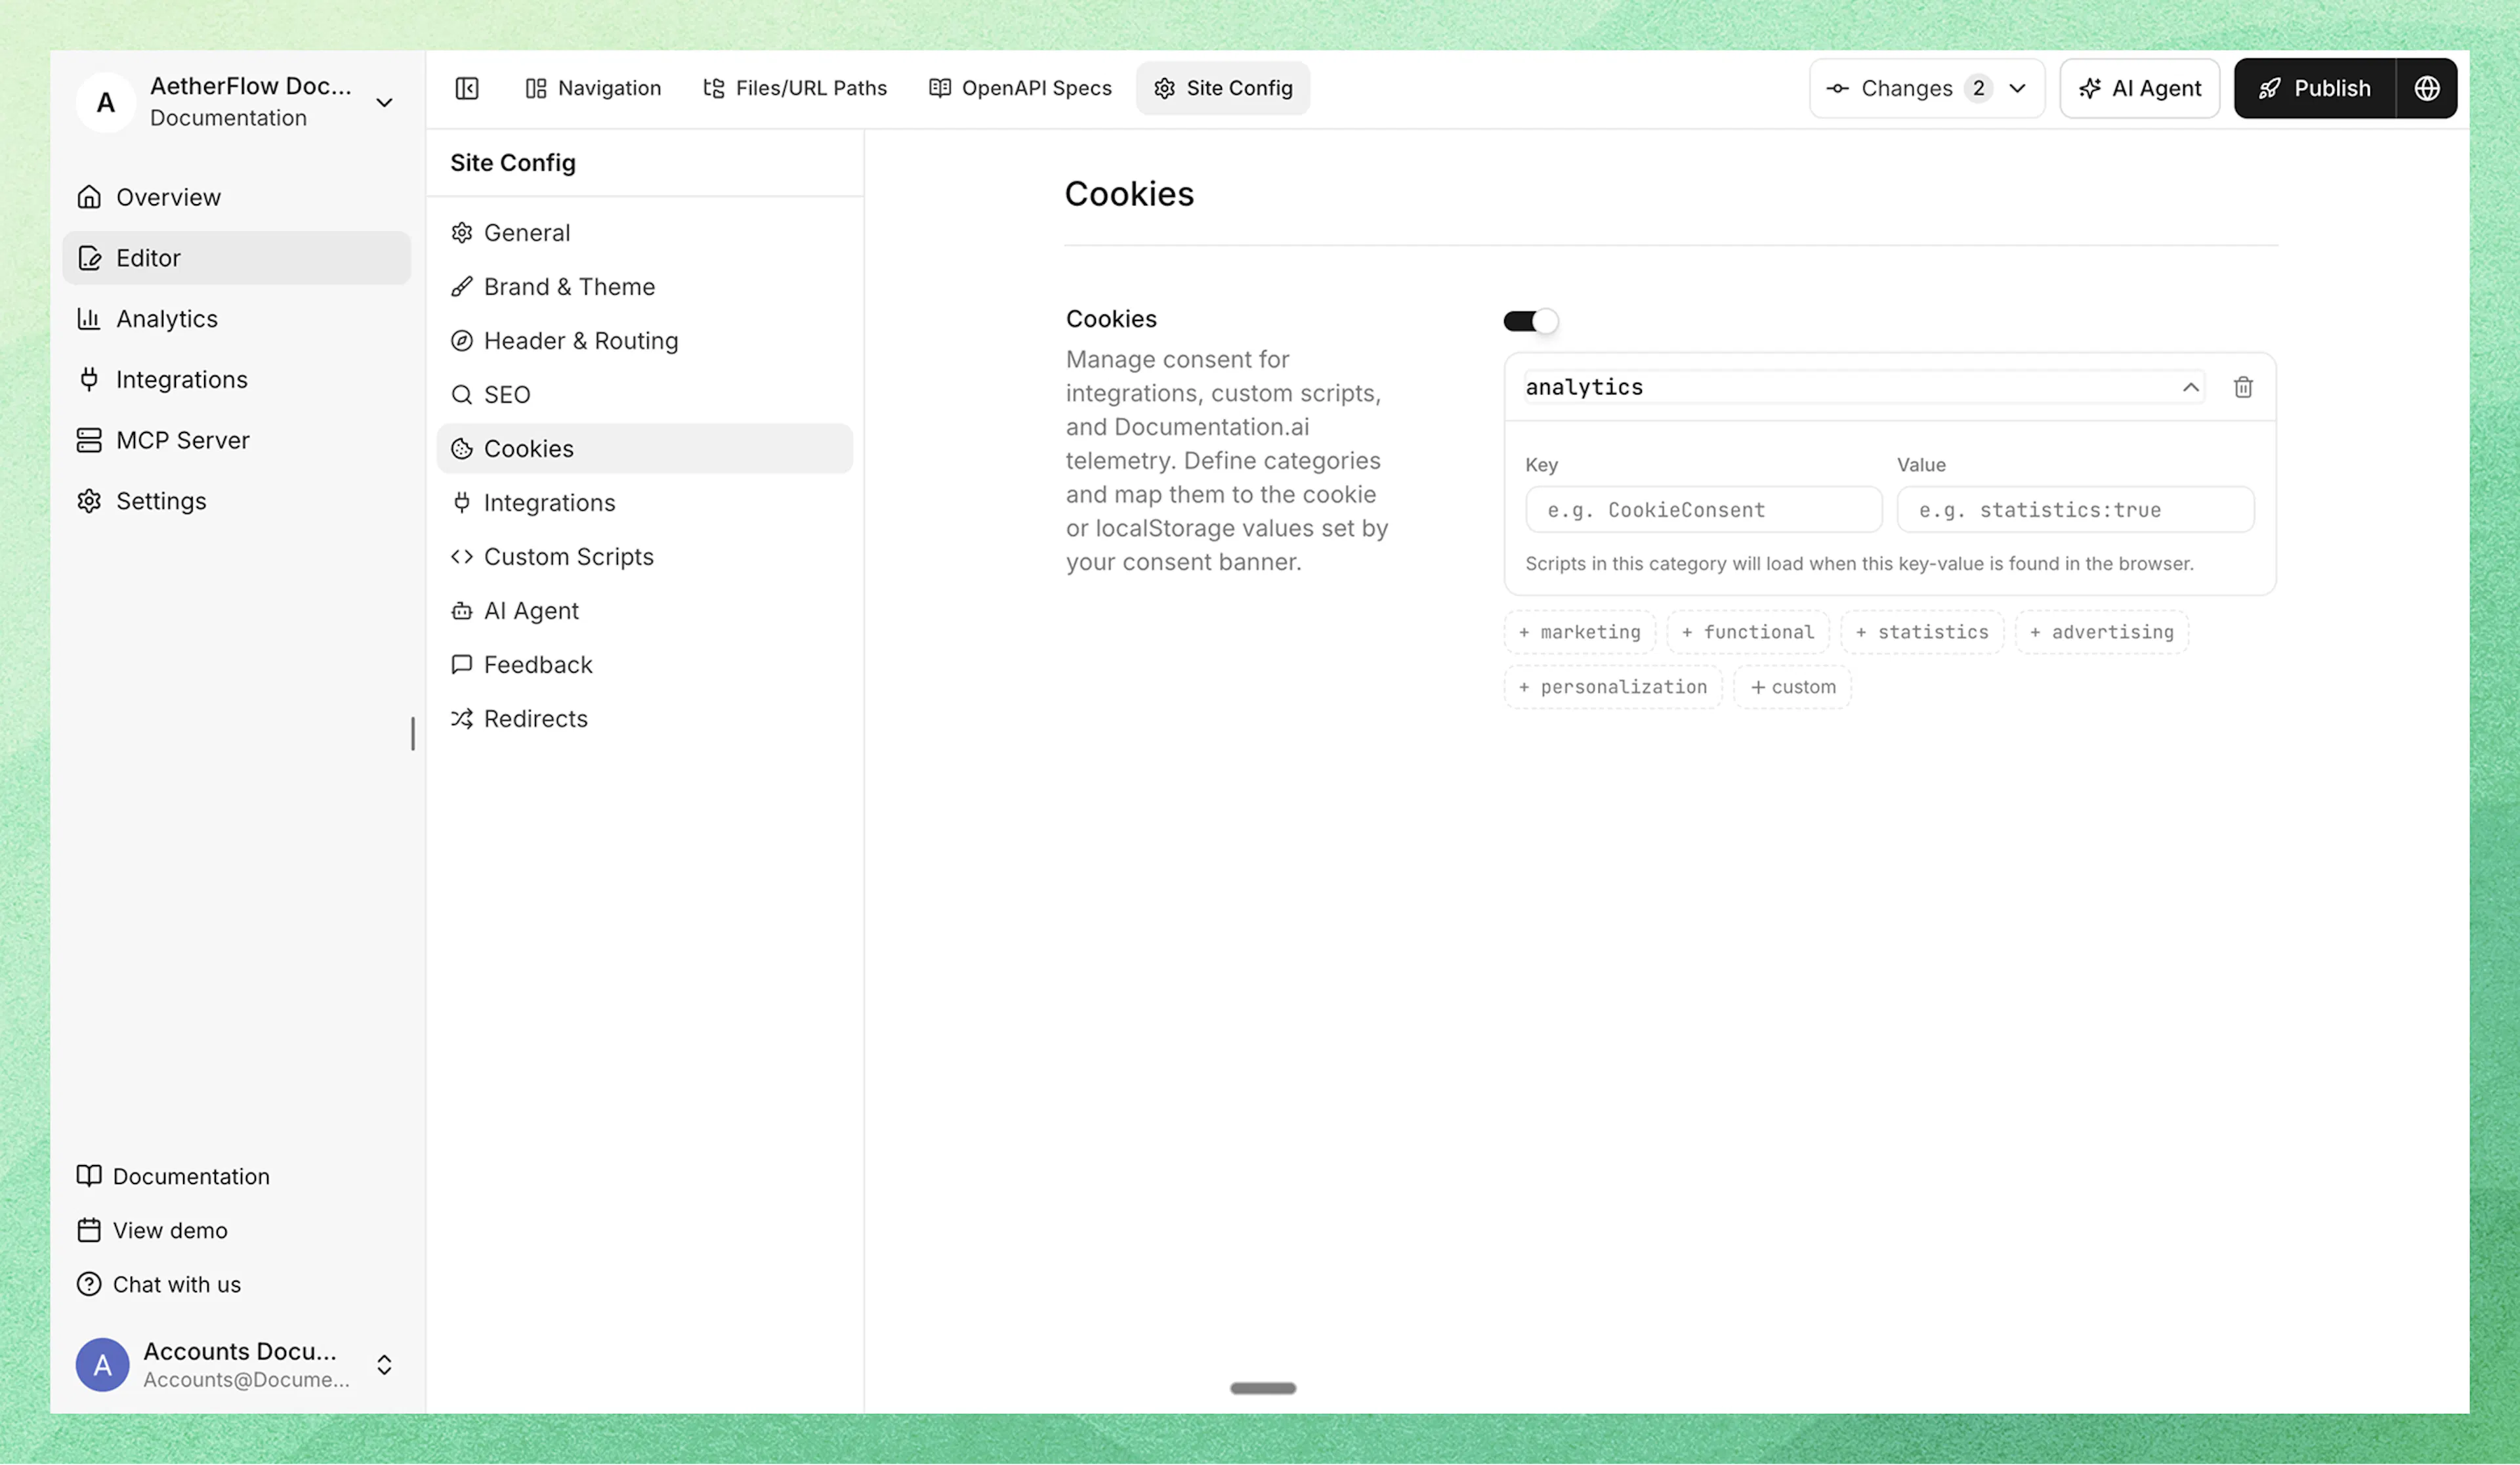
From the Editor
Open Site Config
In the Editor, click Site Config in the top toolbar.
Navigate to Cookies
Select Cookies from the left sidebar.
Enable and add categories
Toggle cookie consent on. An analytics category is created by default. Add more categories using the quick-add buttons (marketing, functional, etc.) or create a custom one.
Fill in key and value
For each category, enter the key and value from your CMP:
-
Key: the cookie name or localStorage key your CMP writes (e.g.,
CookieConsent) -
Value: the substring that indicates consent for this category (e.g.,
statistics:true)
Publish
Click Publish to deploy the consent configuration.
Via documentation.json
{
  "integrations": {
    "cookies": {
      "analytics": {
        "key": "CookieConsent",
        "value": "statistics:true"
      },
      "marketing": {
        "key": "CookieConsent",
        "value": "marketing:true"
      }
    },
    "ga4": {
      "measurementId": "G-XXXXXXXXXX",
      "category": "analytics"
    },
    "intercom": {
      "appId": "abc123"
    }
  },
  "scripts": [
    { "src": "https://consent.cookiebot.com/uc.js?cbid=YOUR_ID" }
  ]
}
Step 3: Assign categories to integrations and scripts
Integration categories
Each integration can include an optional category field. Most integrations already have a sensible default:
| Integration | Default Category |
|---|---|
| ga4, gtm, posthog, mixpanel, amplitude, segment, plausible, fathom, pirsch, heap, hightouch, hotjar, clarity, logrocket | analytics |
| clearbit | marketing |
| intercom, crisp | essential (always loads) |
To override a default, add a category field:
"ga4": { "measurementId": "G-XXXXXXXXXX", "category": "marketing" }
You can also set categories from the Editor; when cookies are configured, each integration card shows a Consent Category dropdown.
Custom script categories
Custom scripts default to essential (always loads). To gate a script behind consent, add a category field:
{
  "scripts": [
    { "src": "https://consent.cookiebot.com/uc.js?cbid=YOUR_ID" },
    { "src": "scripts/fonts.js" },
    { "src": "scripts/tracking.js", "category": "analytics" }
  ]
}
| Script | Category | Behavior |
|---|---|---|
| CMP banner script | essential (default) | Always loads: the banner must show before any consent can be given |
fonts.js | essential (default) | Always loads: no category field means essential |
tracking.js | analytics | Only loads after analytics consent is granted |
Never assign a consent category to your CMP banner script. If the banner itself requires consent to load, visitors will never see it and can never grant consent.
CMP reference
Below are the exact cookie key-value pairs for popular CMPs. Copy the cookies configuration for your provider into your documentation.json.
CookieBot
CookieBot stores consent in a cookie called CookieConsent with category flags.
"cookies": {
  "analytics": { "key": "CookieConsent", "value": "statistics:true" },
  "marketing": { "key": "CookieConsent", "value": "marketing:true" },
  "functional": { "key": "CookieConsent", "value": "preferences:true" }
}
OneTrust
OneTrust uses group IDs in a cookie called OptanonConsent.
"cookies": {
  "analytics": { "key": "OptanonConsent", "value": "C0002:1" },
  "functional": { "key": "OptanonConsent", "value": "C0003:1" },
  "marketing": { "key": "OptanonConsent", "value": "C0004:1" }
}
CookieYes
CookieYes stores consent in a cookie called cookieyes-consent.
"cookies": {
  "analytics": { "key": "cookieyes-consent", "value": "analytics:yes" },
  "functional": { "key": "cookieyes-consent", "value": "functional:yes" },
  "marketing": { "key": "cookieyes-consent", "value": "advertisement:yes" }
}
Osano
"cookies": {
  "analytics": { "key": "osano_consentmanager", "value": "ANALYTICS":"ACCEPT" },
  "marketing": { "key": "osano_consentmanager", "value": "MARKETING":"ACCEPT" }
}
Termly
"cookies": {
  "analytics": { "key": "termly_consent_preferences", "value": ""analytics":true" },
  "marketing": { "key": "termly_consent_preferences", "value": ""advertising":true" }
}
Custom consent banner
If you built your own consent banner that sets a simple localStorage value when the user consents:
"cookies": {
  "analytics": { "key": "my_site_consent", "value": "accepted" }
}
Category names are flexible; use whatever names match your CMP's terminology. Common names include analytics, statistics, marketing, advertising, functional, and personalization.
Not sure which values to use?
If your CMP isn't listed above, you can find the cookie values yourself:
-
Open your documentation site in a browser
-
Accept all cookies in the consent banner
-
Open Developer Tools (F12) > Application tab > Cookies or Local Storage
-
Look for a cookie set by your CMP (usually named after the provider)
-
The cookie value contains the consent state; find the substring that indicates consent for each category
You don't need to match the entire cookie value. Documentation.ai checks if the stored value contains your configured substring. For example, if the full cookie value is {statistics:true,marketing:false}, setting the value to statistics:true is enough.
Telemetry
Documentation.ai includes built-in page view tracking (telemetry) that powers your analytics dashboard. You can disable it entirely or gate it behind consent.
Disable telemetry
{
  "integrations": {
    "telemetry": { "enabled": "false" }
  }
}
Gate telemetry behind consent
When cookie consent is configured, telemetry is automatically gated behind the analytics consent category. To assign it to a different category:
{
  "integrations": {
    "telemetry": { "category": "statistics" },
    "cookies": {
      "statistics": { "key": "CookieConsent", "value": "statistics:true" }
    }
  }
}
You can also manage telemetry from the Editor under Integrations > Telemetry.
Complete example
Here's a full configuration with CookieBot as the CMP, Google Analytics gated behind analytics consent, and the CMP banner script loading as essential:
{
  "integrations": {
    "cookies": {
      "analytics": { "key": "CookieConsent", "value": "statistics:true" },
      "marketing": { "key": "CookieConsent", "value": "marketing:true" }
    },
    "ga4": { "measurementId": "G-XXXXXXXXXX" },
    "posthog": { "apiKey": "phc_xxxx" },
    "clearbit": { "publicKey": "pk_xxxx" },
    "intercom": { "appId": "abc123" }
  },
  "scripts": [
    { "src": "https://consent.cookiebot.com/uc.js?cbid=YOUR_ID" },
    { "src": "scripts/fonts.js" },
    { "src": "scripts/ad-pixel.js", "category": "marketing" }
  ]
}
What happens:
| Script / Integration | Category | Behavior |
|---|---|---|
| CookieBot banner | essential (default) | Always loads |
fonts.js | essential (default) | Always loads |
| Google Analytics | analytics (default) | Loads after analytics consent |
| PostHog | analytics (default) | Loads after analytics consent |
| Clearbit | marketing (default) | Loads after marketing consent |
| Intercom | essential (default) | Always loads |
ad-pixel.js | marketing (explicit) | Loads after marketing consent |
| Documentation.ai telemetry | analytics (default) | Loads after analytics consent |
How consent detection works
Documentation.ai checks for consent in two places:
-
localStorage: checked first
-
Cookies: checked as fallback
Consent changes are detected automatically through:
-
CookieStore API (Chrome, Edge): instantly detects any cookie change
-
Storage events: detects localStorage changes across browser tabs
-
Page navigation: consent state is re-evaluated on every page transition
Troubleshooting
CMP banner not showing: The consent banner must be added as a custom script. Cookie consent configuration only controls when other scripts load; it does not include a banner. Make sure your CMP script has no category field (or explicitly set it to essential).
Scripts loading without consent: Verify that the category field on the integration or script matches a key in your cookies configuration. Category names are case-sensitive.
Consent not detected: Check that the key and value in your cookies config exactly match what your CMP writes. Open DevTools > Application > Cookies to inspect the actual cookie values.
Telemetry still tracking: If you disabled telemetry via "enabled": "false", make sure the value is a string "false", not a boolean false.
What's next
-
Custom Scripts - add your CMP banner script
-
Integrations - connect analytics and chat providers
-
Site Configuration - full configuration reference