Steps
Display sequential instructions or processes with numbered or icon-based steps and connecting lines.
Overview
The Steps component creates visually connected step-by-step instructions with automatic numbering, optional icons, and rich content inside each step.
You can add steps in two ways:
- Editor UI: Insert Steps from the / commands menu and edit them visually (no code required).
- MDX: Use the
<Steps>and<Step>components directly in your content.
Common use cases:
- Installation and setup guides
- Multi-step tutorials and onboarding flows
- Process documentation showing workflow stages
- Configuration guides and migration procedures
Using with Web Editor
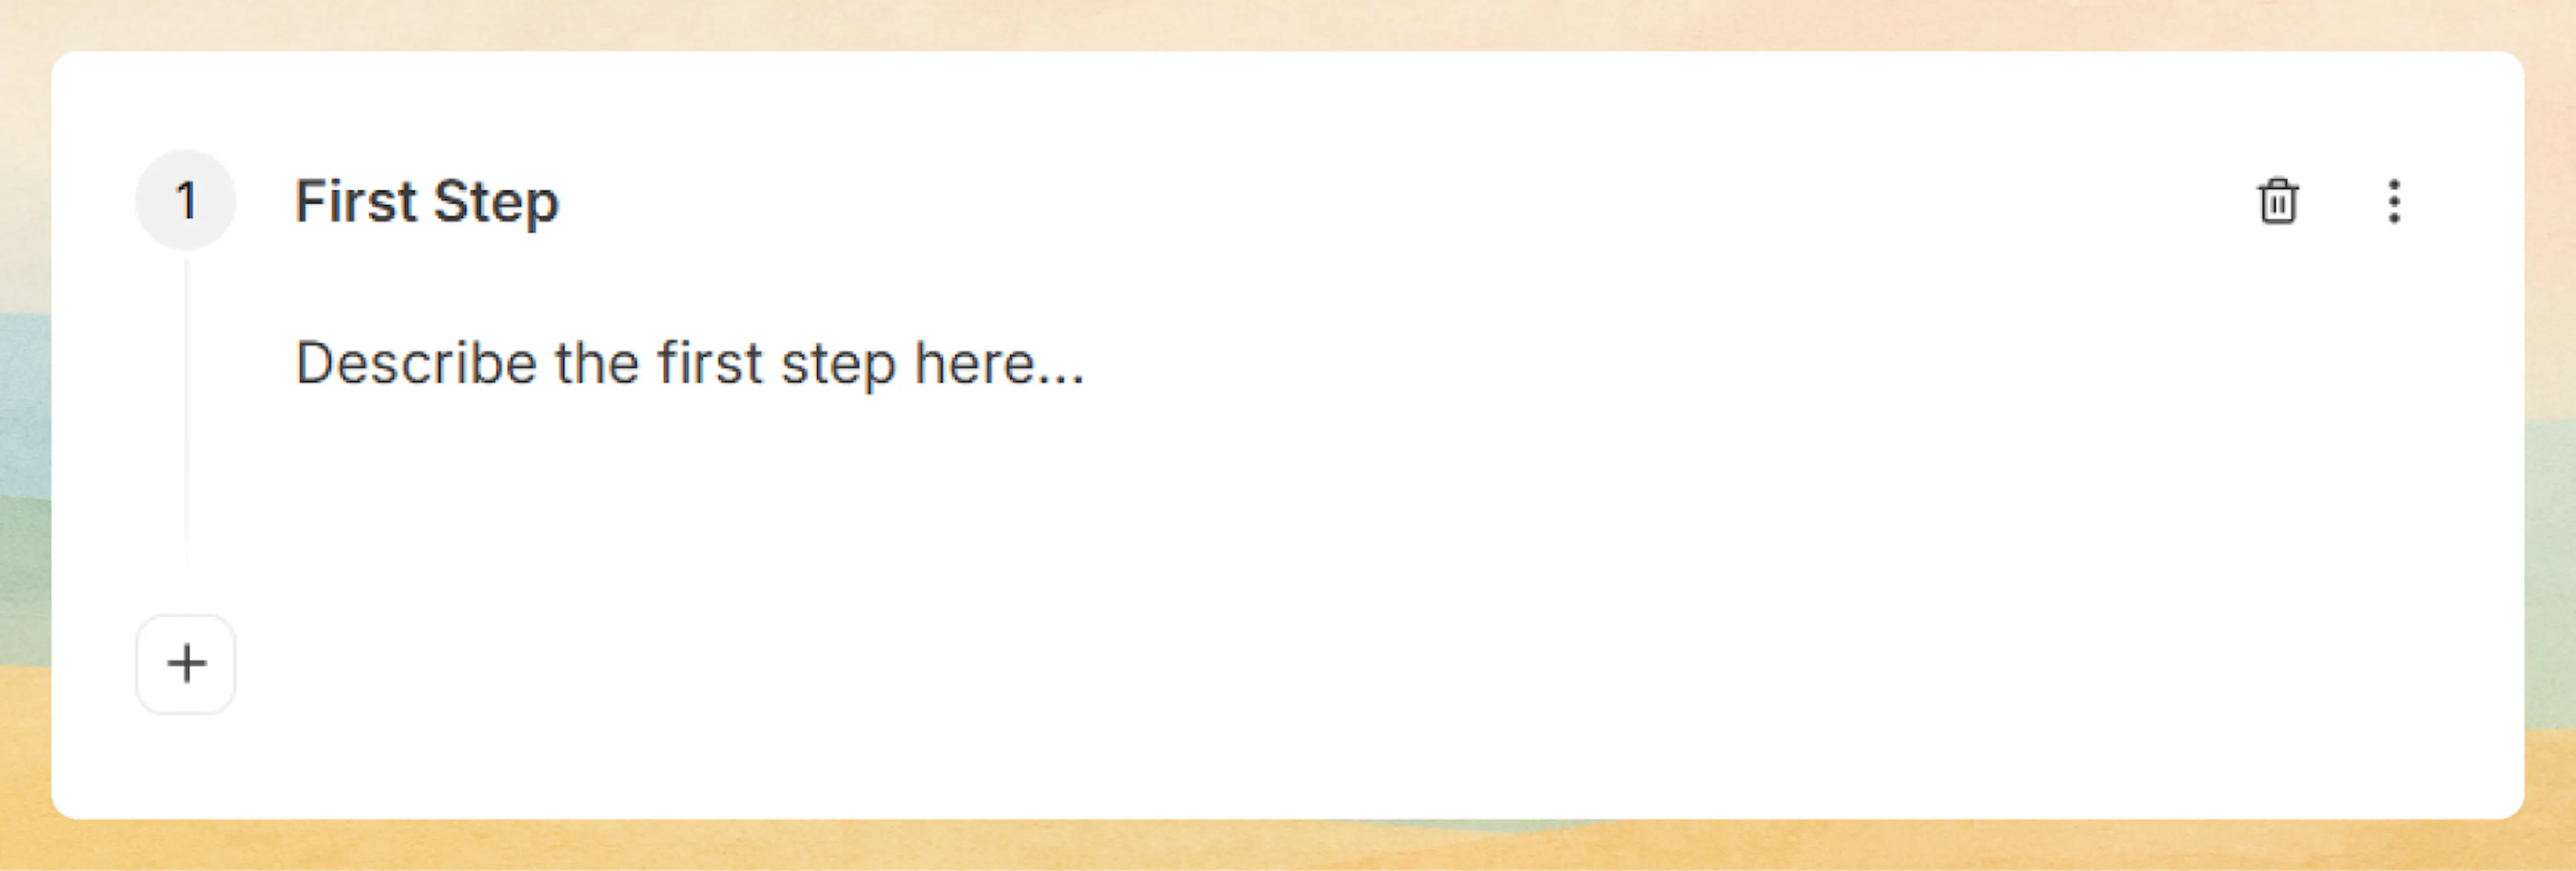
Add a steps block
Choose placement
Click in the editor where you want the steps to appear.
Open the command menu
Type / to open the component picker and search for Steps
Insert the block
Select Steps to add a steps block with the first step already created.
Prefer writing in code?
You can switch to MDX view inside the Web Editor to write or edit this component using the same syntax as the Code Editor. This is useful if you want full control while staying in the Web Editor.
To add more steps:
- Click the + button below the last step.
- New steps are added with automatic numbering by default (1, 2, 3, …).
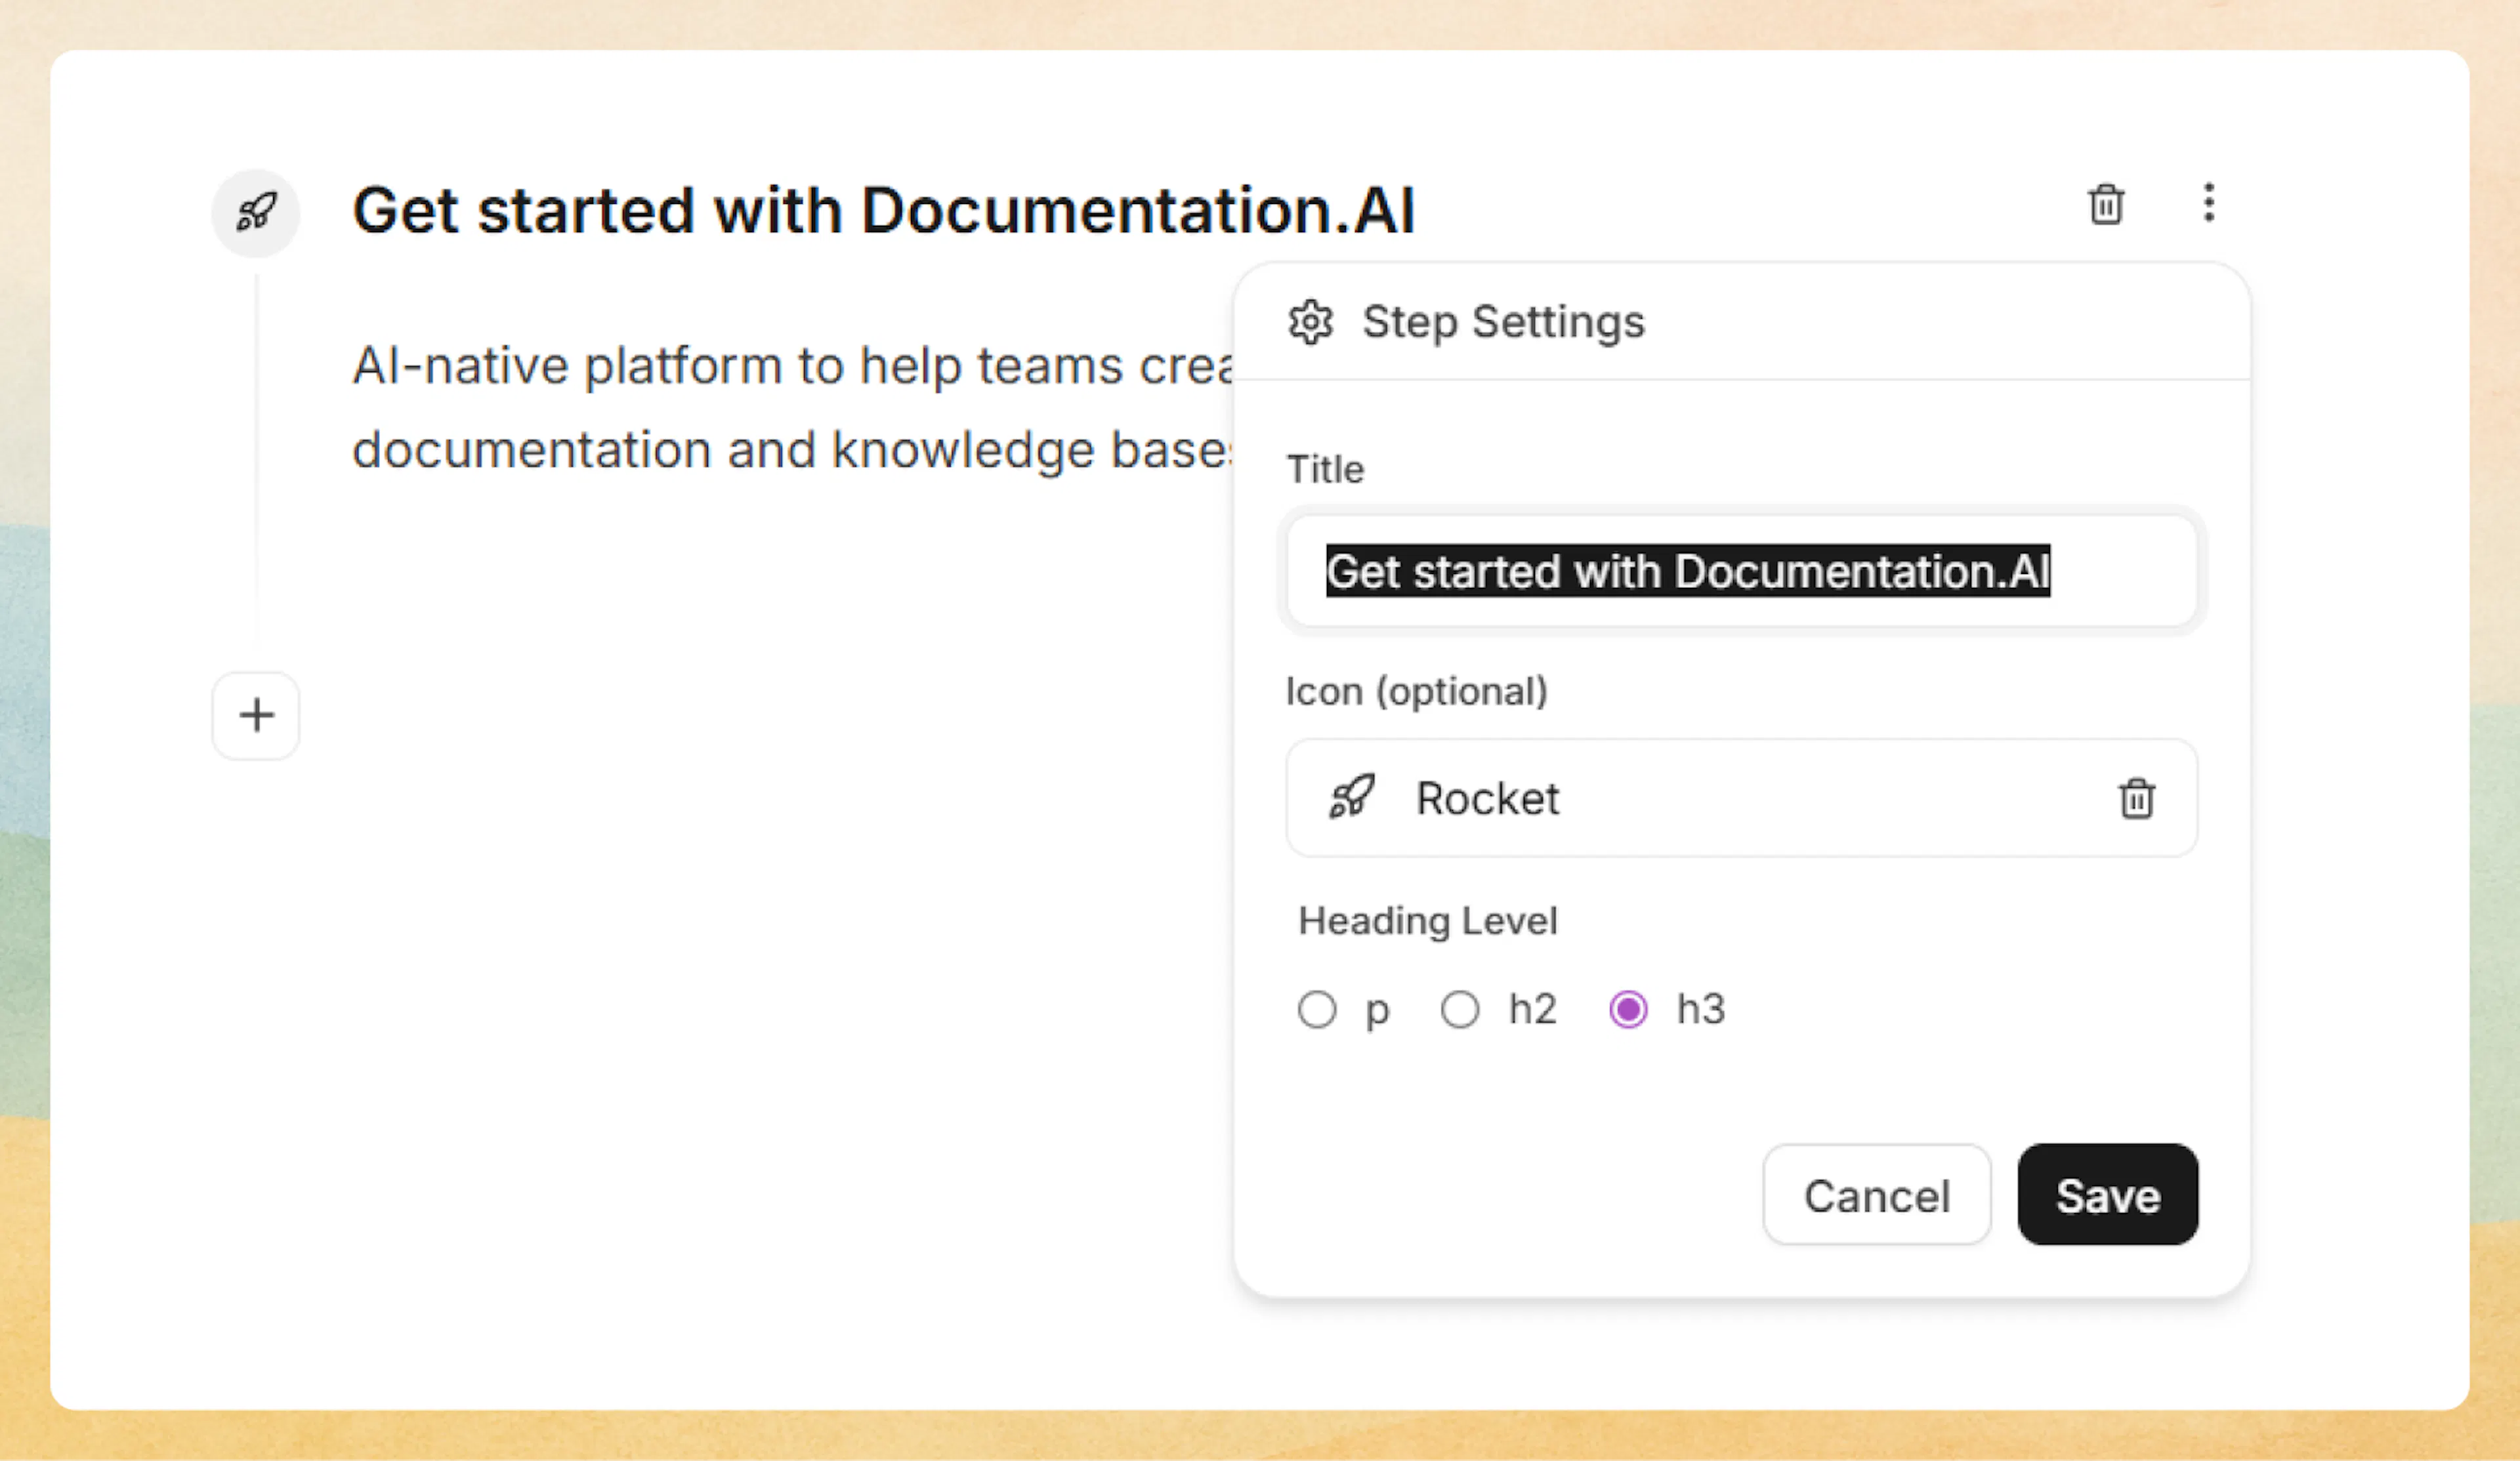
Edit the step title, icon, and heading level
For each step:
- Click the three-dot menu on the right side of the step.
- In Step Settings:
-
Title: Change the step title text.
-
Icon (optional): Search for a Lucide icon (for example,
check,arrow-right,database) and select it.- When you choose an icon, it replaces the number for that step.
-
Heading Level: Choose how the title should render:
- p – Paragraph style (default).
- h2 – Heading level 2.
- h3 – Heading level 3.
This controls the underlying HTML heading level for better SEO and accessibility.
-
Click Save to apply your changes.
Edit the step description
- Click in the description area (“Description for this step…”) to edit it directly.
- You can add any rich content inside the description:
- Text, headings, lists
- Images and videos
- Code blocks and Code Groups
- Callouts, tables, expandables, and more
Each step behaves like a mini content section, so you can structure complex instructions clearly.
Using with Code Editor
<Steps>
  <Step title="Install dependencies" icon="download">
    Run the installation command to add required packages to your project.

    ```bash
    npm install documentation-ai
    ```
  </Step>
  <Step title="Configure settings" icon="settings">
    Create a configuration file in your project root with your API credentials.

    ```javascript
    module.exports = {
      apiKey: process.env.DOC_AI_KEY
    }
    ```
  </Step>
  <Step title="Deploy documentation" icon="rocket">
    Push your changes and deploy to production.

    ```bash
    npm run deploy
    ```
  </Step>
</Steps>
Install dependencies
Run the installation command to add required packages to your project.
npm install documentation-ai
Configure settings
Create a configuration file in your project root with your API credentials.
module.exports = {
  apiKey: process.env.DOC_AI_KEY
}
Deploy documentation
Push your changes and deploy to production.
npm run deploy
Basic syntax
Use the <Steps> component as a container with individual <Step> components for each instruction:
<Steps>
  <Step title="First step" icon="circle-check">
    Description and content for the first step.
  </Step>
  <Step title="Second step" icon="circle-check">
    Description and content for the second step.
  </Step>
</Steps>
First step
Description and content for the first step.
Second step
Description and content for the second step.
Automatic numbering
Omit the icon attribute to display automatic sequential numbering:
<Steps>
  <Step title="Create your account">
    Sign up with your email address and create a secure password.
  </Step>
  <Step title="Verify your email">
    Check your inbox for the verification link and click to confirm.
  </Step>
  <Step title="Complete your profile">
    Add your organization details and team information.
  </Step>
  <Step title="Start building">
    Create your first documentation project and invite team members.
  </Step>
</Steps>
Create your account
Sign up with your email address and create a secure password.
Verify your email
Check your inbox for the verification link and click to confirm.
Complete your profile
Add your organization details and team information.
Start building
Create your first documentation project and invite team members.
Automatic numbering is ideal for sequential processes where order matters and each step builds on the previous one.
Custom icons
Add visual context to each step using Lucide icons:
<Steps>
  <Step title="Clone repository" icon="git-branch">
    Clone the project repository to your local machine.

    ```bash
    git clone https://github.com/your-org/project.git
    ```
  </Step>
  <Step title="Install packages" icon="package">
    Install all project dependencies using your package manager.

    ```bash
    npm install
    ```
  </Step>
  <Step title="Start development" icon="play-circle">
    Launch the development server and open in your browser.

    ```bash
    npm run dev
    ```
  </Step>
</Steps>
Clone repository
Clone the project repository to your local machine.
git clone https://github.com/your-org/project.git
Install packages
Install all project dependencies using your package manager.
npm install
Start development
Launch the development server and open in your browser.
npm run dev
Icon names use Lucide icon library. Reference the Lucide icon directory for available options.
Heading levels
Control the semantic heading level of step titles using the title-type attribute:
<Steps>
  <Step title="Database setup" title-type="h2" icon="database">
    Configure your database connection and run initial migrations.
  </Step>
  <Step title="API configuration" title-type="h2" icon="server">
    Set up API endpoints and authentication middleware.
  </Step>
  <Step title="Frontend integration" title-type="h2" icon="monitor">
    Connect your frontend application to the API.
  </Step>
</Steps>
Database setup
Configure your database connection and run initial migrations.
API configuration
Set up API endpoints and authentication middleware.
Frontend integration
Connect your frontend application to the API.
SEO and accessibility
Use appropriate heading levels to maintain proper document structure and improve SEO:
<Steps>
  <Step title="Planning phase" title-type="h3" icon="clipboard-list">
    Define project requirements and create technical specifications.
  </Step>
  <Step title="Development phase" title-type="h3" icon="code">
    Build features according to specifications and coding standards.
  </Step>
  <Step title="Testing phase" title-type="h3" icon="bug">
    Conduct thorough testing including unit, integration, and end-to-end tests.
  </Step>
  <Step title="Deployment phase" title-type="h3" icon="cloud-upload">
    Deploy to staging environment and prepare for production release.
  </Step>
</Steps>
Planning phase
Define project requirements and create technical specifications.
Development phase
Build features according to specifications and coding standards.
Testing phase
Conduct thorough testing including unit, integration, and end-to-end tests.
Deployment phase
Deploy to staging environment and prepare for production release.
Choose heading levels that fit your document hierarchy. Avoid skipping levels to maintain proper semantic structure.
Rich content support
Steps support any MDX content, including code blocks, callouts, lists, and other components:
<Steps>
  <Step title="Environment setup" icon="folder-cog">
    Create environment variables for different deployment stages.

    <Callout kind="info">
      Store sensitive credentials in environment variables, never commit them to version control.
    </Callout>

    ```bash
    # .env.local
    DATABASE_URL=postgresql://localhost:5432/mydb
    API_KEY=your-api-key-here
    NEXT_PUBLIC_APP_URL=http://localhost:3000
    ```
  </Step>
  <Step title="Security checklist" icon="shield-check">
    Verify your security configuration before deploying:

    - Enable HTTPS for all production environments
    - Configure CORS policies for API endpoints
    - Implement rate limiting on public endpoints
    - Set up monitoring and alerting for suspicious activity
    - Review and update dependency versions
  </Step>
  <Step title="Deploy to production" icon="rocket">
    Run the production deployment command and verify the deployment.

    ```bash
    npm run build
    npm run start
    ```

    <Callout kind="success">
      Monitor application logs and performance metrics for the first 24 hours after deployment.
    </Callout>
  </Step>
</Steps>
Environment setup
Create environment variables for different deployment stages.
Store sensitive credentials in environment variables, never commit them to version control.
# .env.local
DATABASE_URL=postgresql://localhost:5432/mydb
API_KEY=your-api-key-here
NEXT_PUBLIC_APP_URL=http://localhost:3000
Security checklist
Verify your security configuration before deploying:
-
Enable HTTPS for all production environments
-
Configure CORS policies for API endpoints
-
Implement rate limiting on public endpoints
-
Set up monitoring and alerting for suspicious activity
-
Review and update dependency versions
Deploy to production
Run the production deployment command and verify the deployment.
npm run build
npm run start
Monitor application logs and performance metrics for the first 24 hours after deployment.
Advanced options
Attributes
Steps component
The <Steps> component acts as a container and has no configurable attributes. It automatically manages step numbering and layout.
Step component
The heading text is displayed for this step. Serves as the main identifier for each instruction.
Lucide icon name to display instead of automatic numbering. Omit this attribute to show sequential numbers. Reference Lucide icons for available options.
The HTML heading level for the step title. Accepts: p, h2, or h3. Default: p. Use heading levels to maintain proper document structure and improve accessibility.
The content of the step. Supports all MDX content including text, code blocks, callouts, lists, images, and other components.
Common patterns
- Installation guides: Use numbered steps for clear sequential setup.
- Configuration workflows: Combine icons, headings, and code blocks to guide users through complex configuration.
- Migration procedures: Use heading levels and icons to represent phases (Plan → Migrate → Verify → Clean up).
- Troubleshooting flows: Create “Check X, then Y, then Z” diagnostic sequences with clear visual indicators.
- Onboarding sequences: Introduce features step by step with rich descriptions, screenshots, and links.
Steps automatically draw connecting lines between each step, giving your guides a polished, professional feel with no extra styling required.