

Media Library
Upload, insert, reuse, replace, and delete images, videos, and files in your documentation, from the web editor, a Git repository, an AI agent, or the REST API.
The media library stores every image, video, PDF, and file you upload to a documentation. Each file gets a permanent URL you can insert, reuse, and replace from the web editor, reference in MDX, or manage with an AI agent or the REST API. The library keeps one copy of every file, so duplicate uploads are detected and reused automatically.
Before you begin
- You need the Editor or Admin role to upload, insert, or replace files. Only Admins can delete files. AI agents act with your role, and API keys act with the key's role.
- Check that the file is a supported type and within your plan's size limit. See Limits and supported file types.
- If you work in Git, keep the documentation open in the web editor as well. Files are uploaded there or through the REST API, not committed to the repository.
Web editor
How to upload a file
Open the Media tab
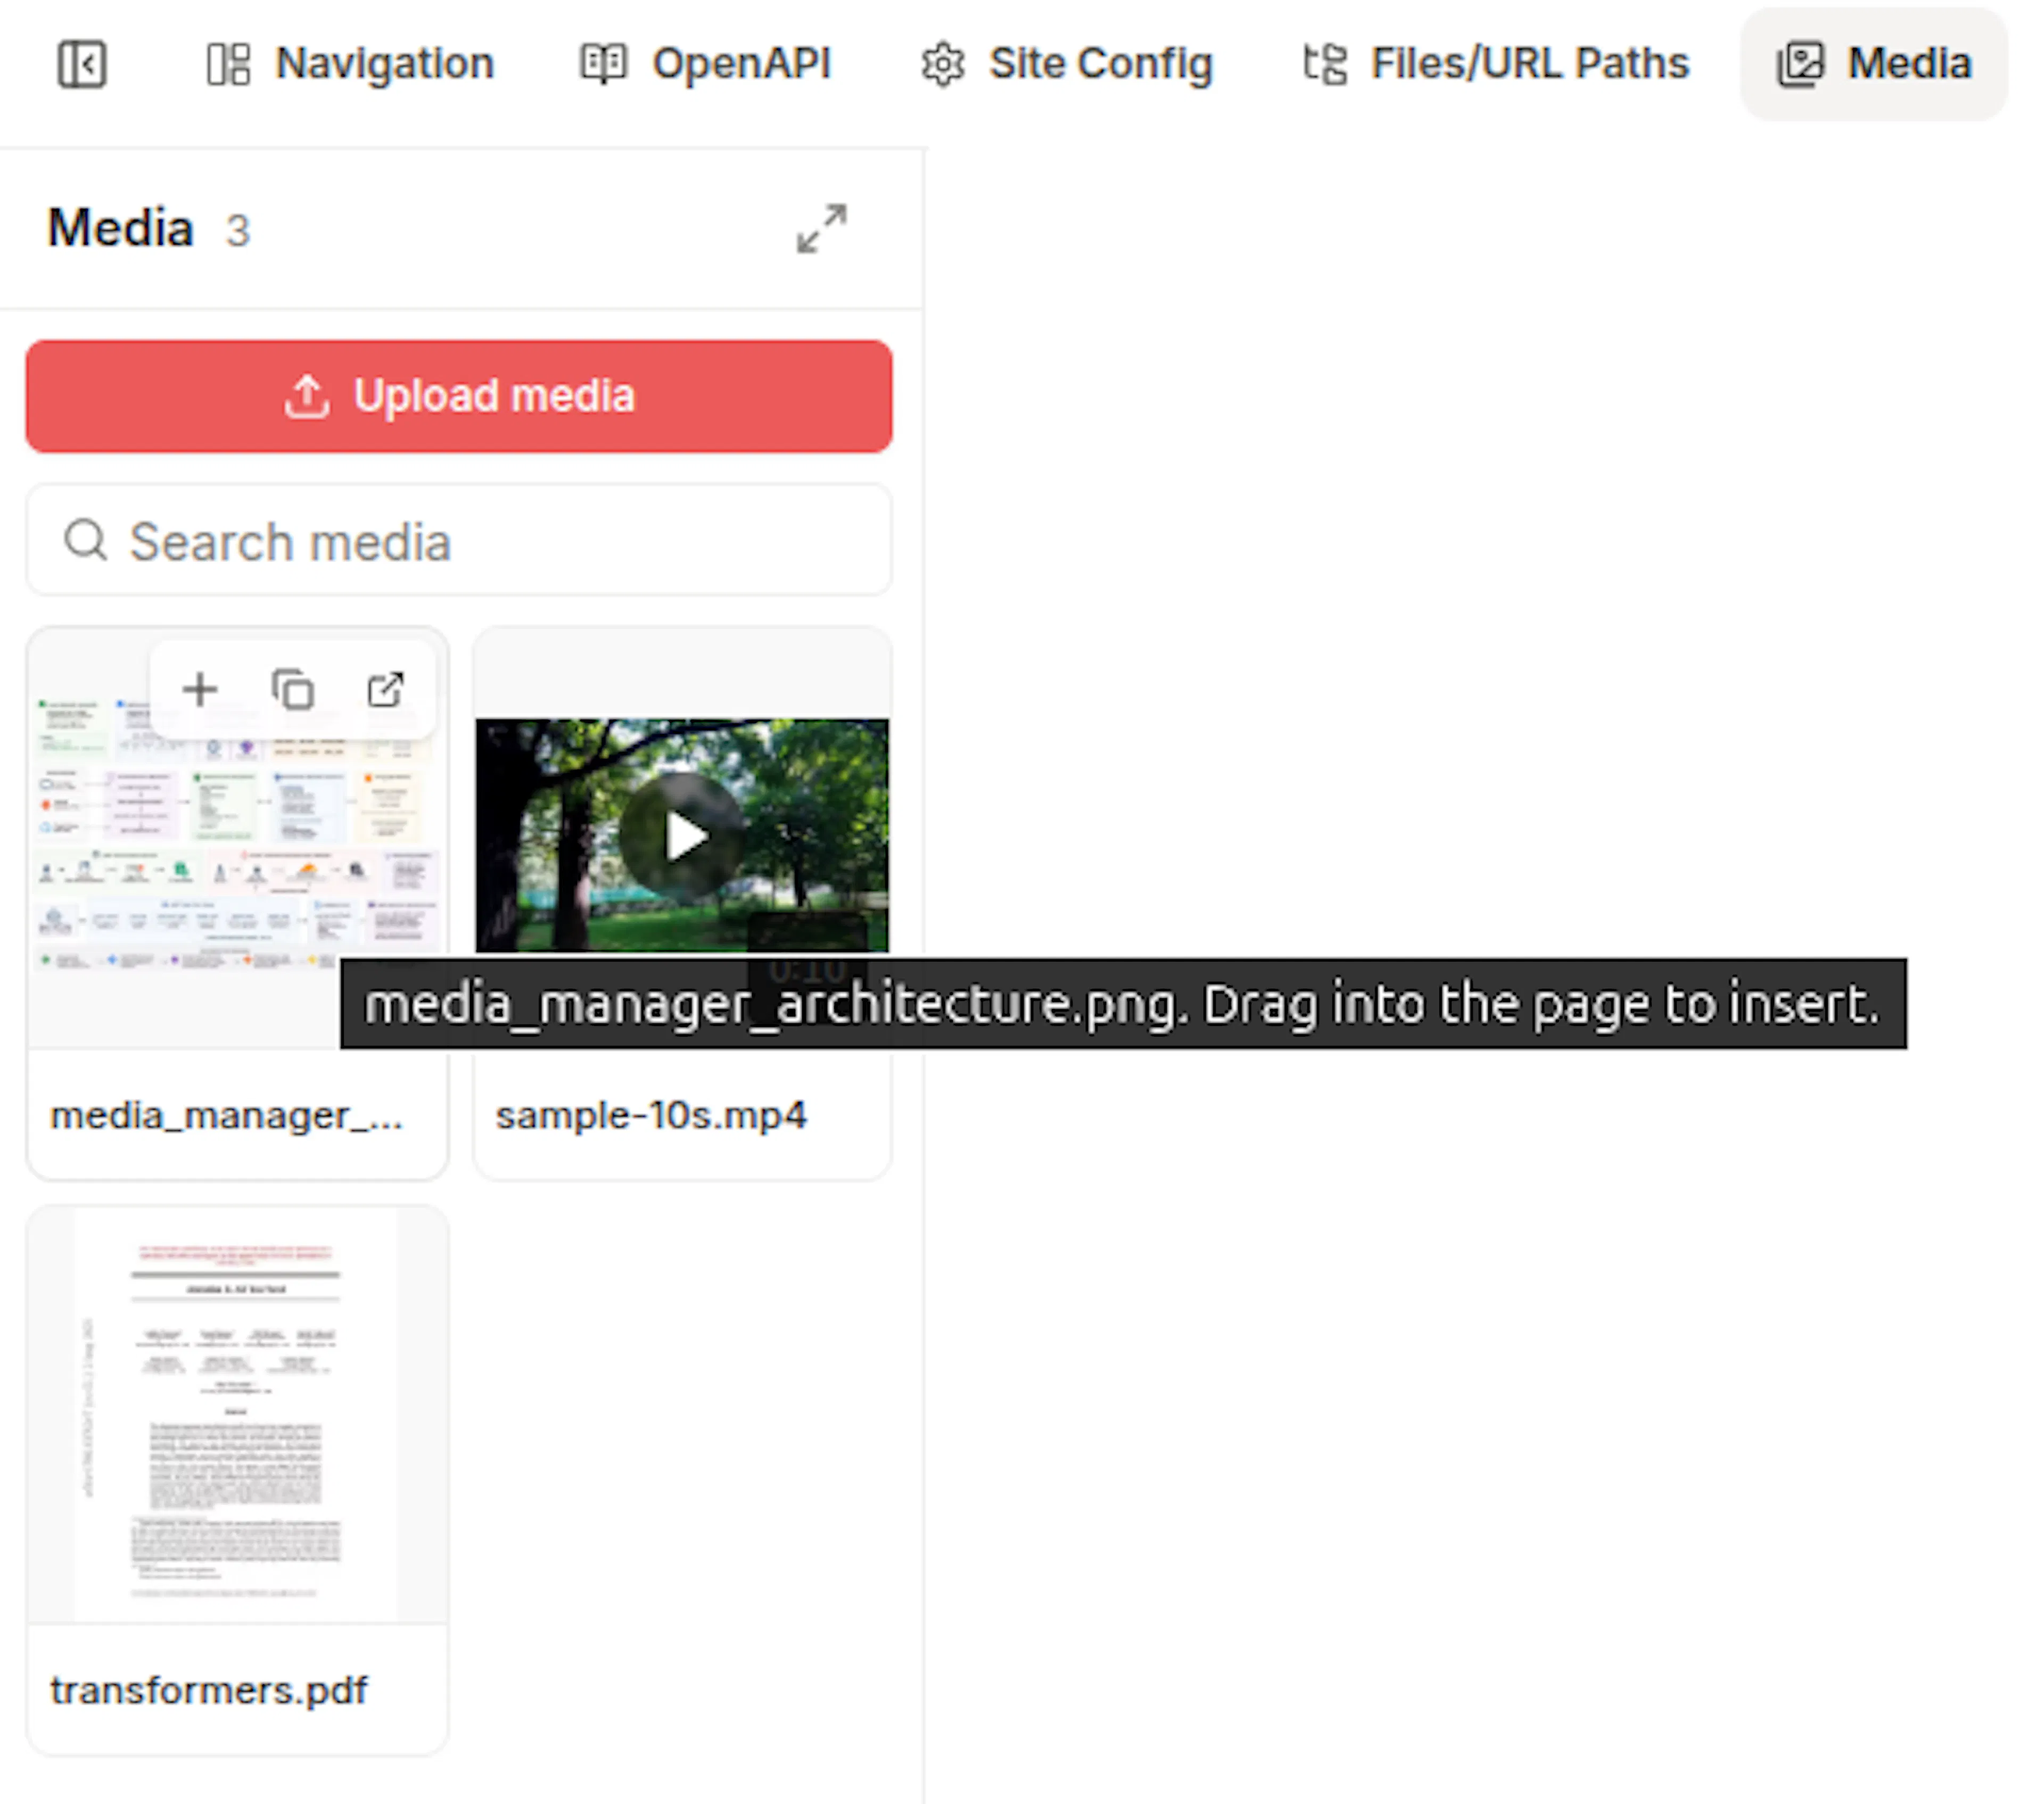
In the web editor, select Media in the secondary navigation bar. Files already in this documentation appear as tiles.
Add the file
Click Upload media and choose the file, or drag it from your computer onto the Media tab.
If you want to upload several files at once, select or drag them together. Each one shows its own progress in the tray at the bottom-right.
Describe the image
If the file is an image, the editor shows Describe this file. Type what the image shows and click Save. This becomes the alt text that screen readers read.
If the image is decorative, click Skip.
If the editor says "That file is already in your library", the existing file is reused. You do not need to do anything.
If you would rather upload while inserting, use the Upload tile in the /image, /video, or /file picker instead. See How to add an image, video, or file to a page.
How to add an image, video, or file to a page
Open the page first. Insert always goes into the page that is currently open.
Then use whichever method suits what you are doing:
- If the file is already in the library, hover its tile in the Media tab and click Insert into page (images and videos) or Insert link into page (everything else). Or drag the tile onto the page and drop it where you want it.
- If you are typing and want to add something in place, type / on an empty line and choose:
- Image for a screenshot, diagram, or logo
- Video for a video file, or a YouTube, Vimeo, or Loom link
- File for a PDF, spreadsheet, presentation, ZIP, audio clip, or font In the picker, select a tile or click Upload to add a new file, then click Insert.
- If the file is still on your computer, drop it onto the page or paste it from the clipboard. An image opens a small dialog so you can name it and add alt text. Any other supported file uploads and appears as a link at the drop point.
What lands on the page depends on the kind of file:
| Kind | Result |
|---|---|
| Image | An image block with the file's alt text |
| Video file | A video player with a preview frame |
| Video link (YouTube and similar) | An embedded player |
| PDF, document, data, archive, audio, font | A link. Its text is the file's description, or its name |
To adjust size, alignment, or captions after inserting, see Images and Videos and iframes.
How to reuse a file on another page
Open the other page, then insert the file from the Media tab or the slash-command picker as described above. Do not upload it again. Every page that uses the file points at the same URL, so a later replacement updates all of them together.
How to find a file
If the Media tab shows too many tiles, type part of the file name in the search box at the top.
If you need filters or a list view, click the expand icon in the tab header (Open the media library). In the Media library window you can:
- Search by file name or alt text
- Filter by Type (Images, Video, Documents, Data, Audio, Archives, Fonts), Size, or Added date
- Sort by Newest, Oldest, Name, or Largest
- Switch to List view to see name, type, and date in columns
- Change Show to load 30, 60, or 120 files at a time, and click Load more for the next batch
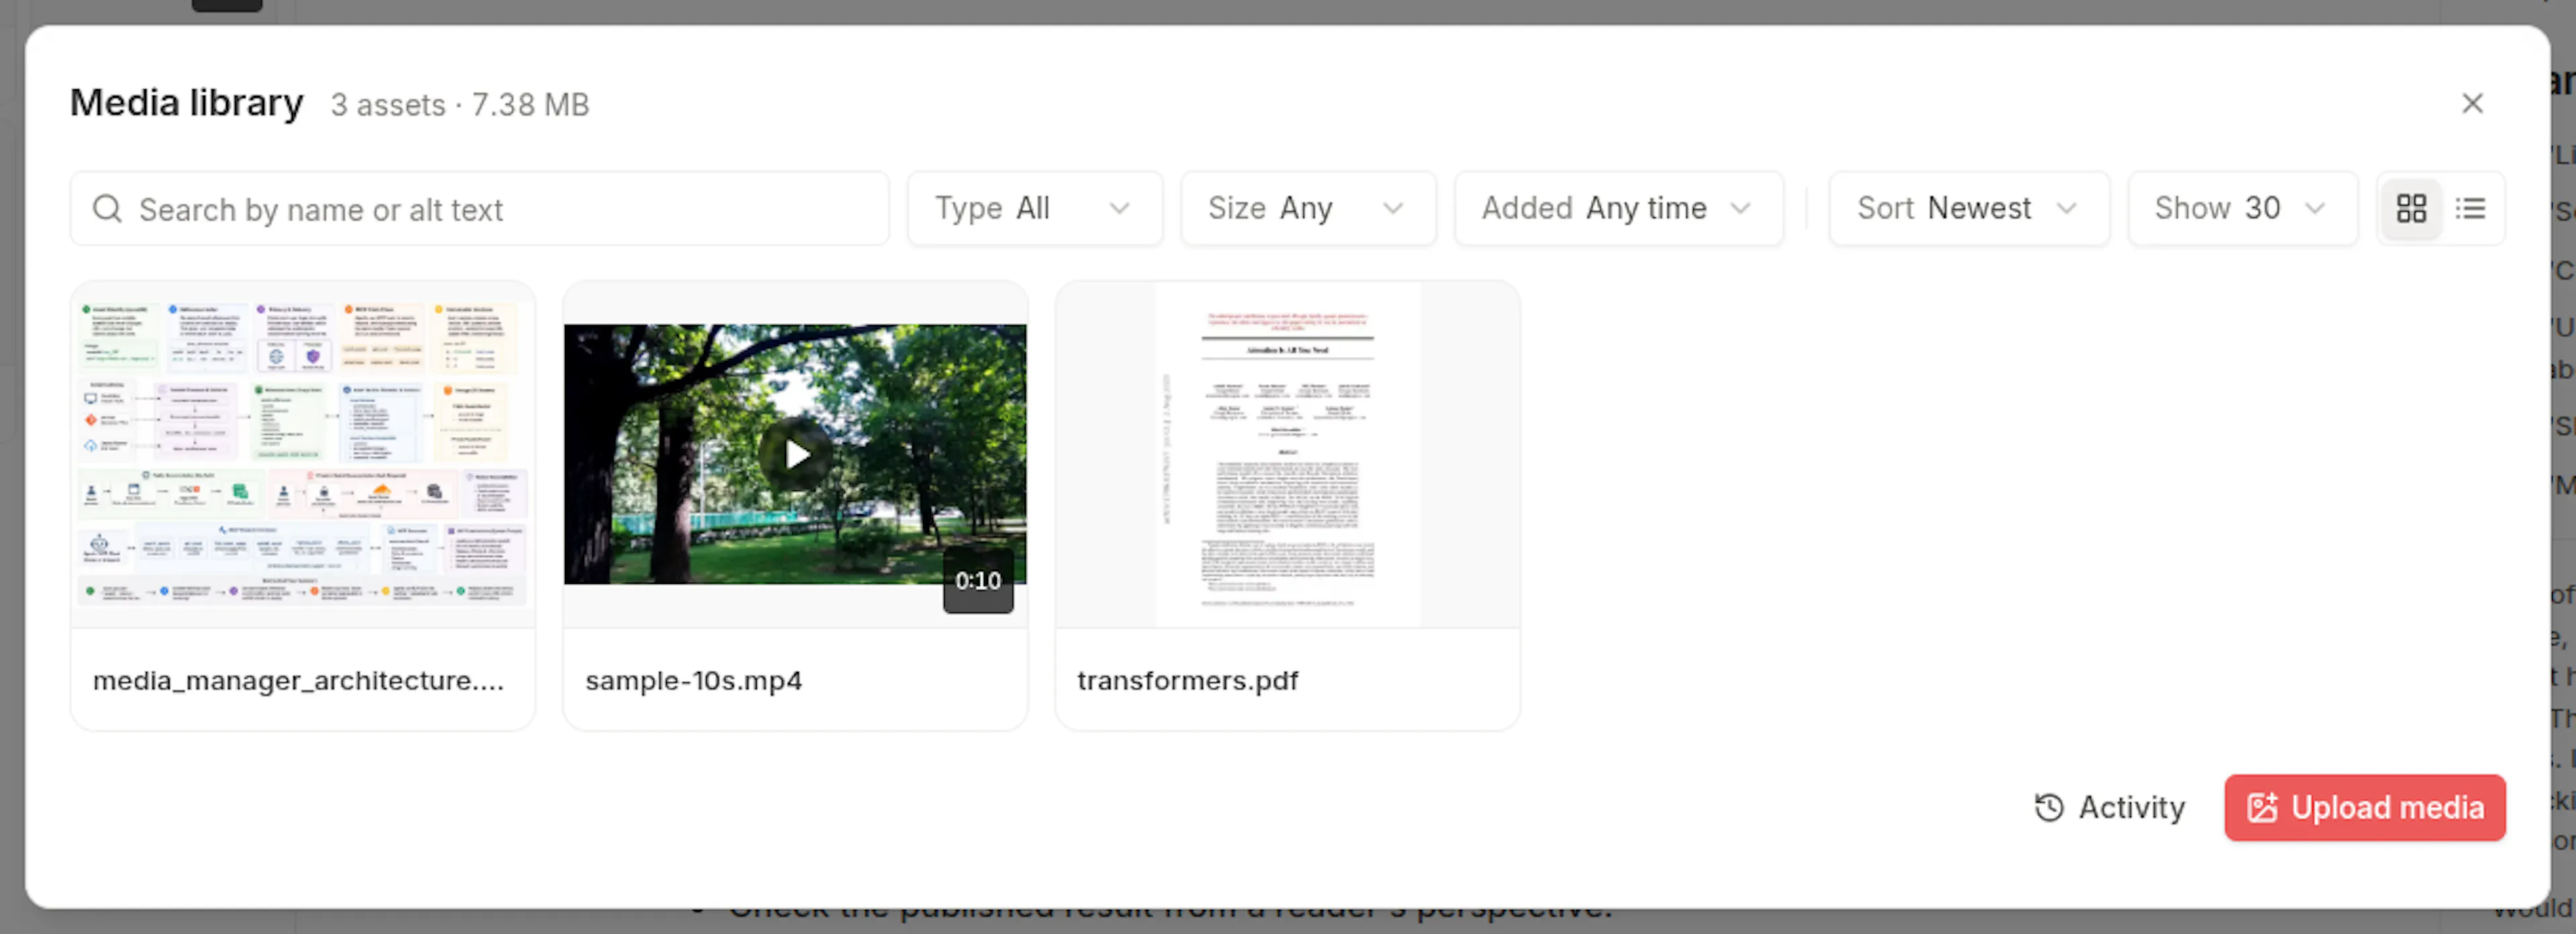
Click any tile to open its detail panel.
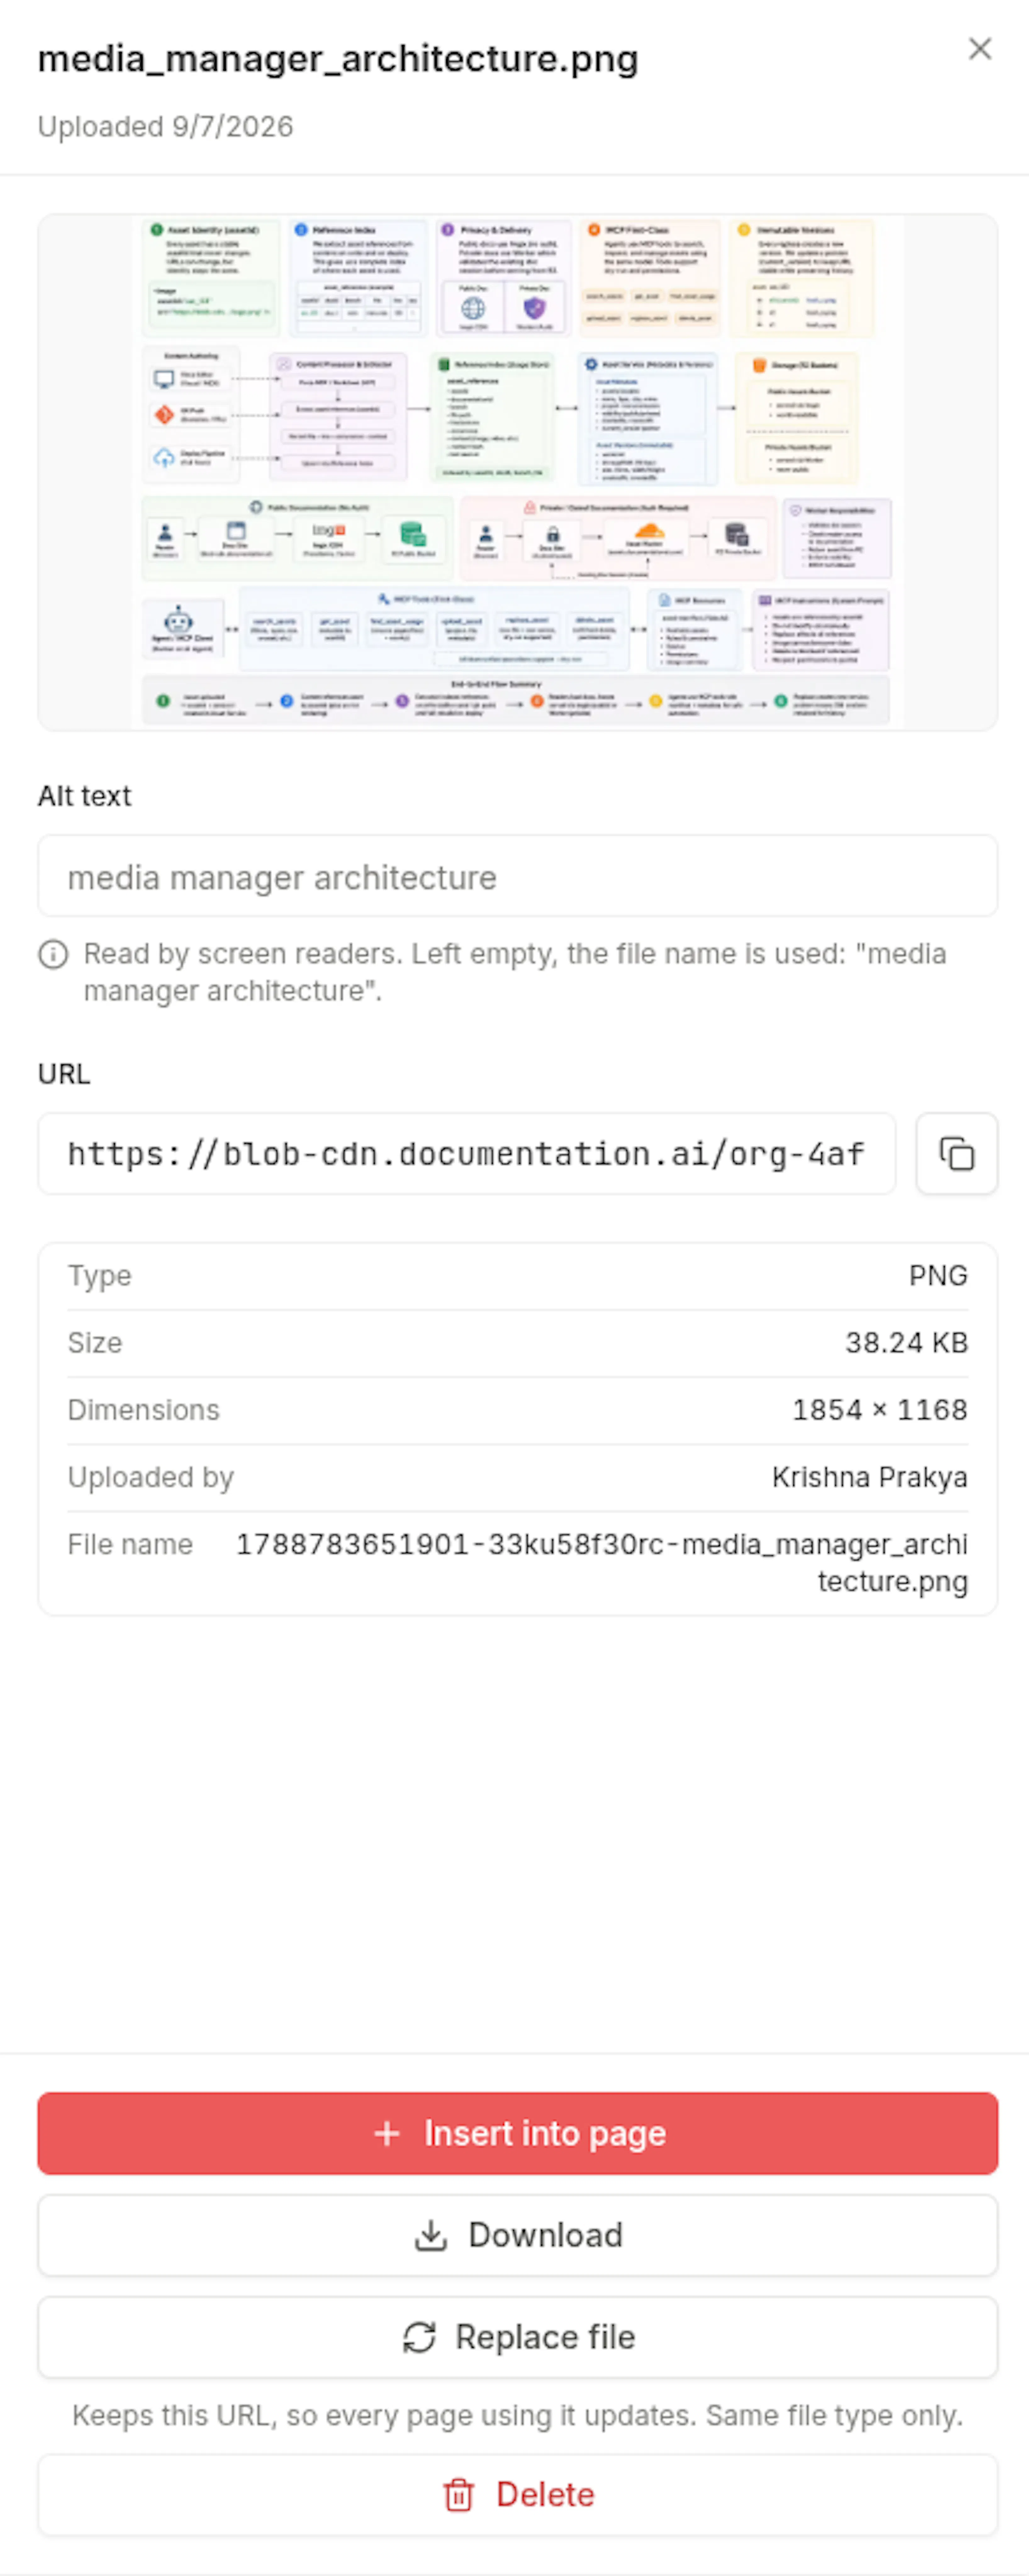
How to change a file's alt text or link text
- Click the file's tile to open the detail panel.
- Edit the field at the top:
- For an image, this is Alt text.
- For any other file, this is Description. It is used as the link text the next time someone inserts the file.
- Click Save alt text.
Changing the description does not rewrite links already on pages. If you want to change existing link text, edit it on the page like any other link.
How to update a file everywhere it is used
Use Replace file when you have a newer version of a file. Every page that uses it shows the new version without any edits to those pages.
Open the file
Click the file's tile in the Media tab or the Media library window to open its detail panel.
Choose the replacement
Click Replace file and choose the new file. It must be the same type as the original, for example a PNG for a PNG or a PDF for a PDF.
If you need to switch formats, insert the new file separately and remove the old one instead.
Wait for the confirmation
A toast shows Uploading…, then Replacing across your documentation…, then File replaced.
If the file is an image, its tile shows a Replacing overlay for up to a minute while the CDN refreshes. Reload a page after that to see the new version.
If you see "Someone else replaced this file first", reload and check the current version before replacing again.
How to delete a file
Admin only. Deletion does not check whether pages still use the file. Pages keep working, but the deleted image, video, or link target shows as missing. If you only need newer content, use Replace file instead.
- To delete one file, open its detail panel, click Delete, and confirm.
- To delete several files, open the Media library window, hover tiles and tick their checkboxes (or click Select all), click Delete in the bar at the bottom, and confirm. You can delete up to 100 files at once.
Deleting frees storage immediately.
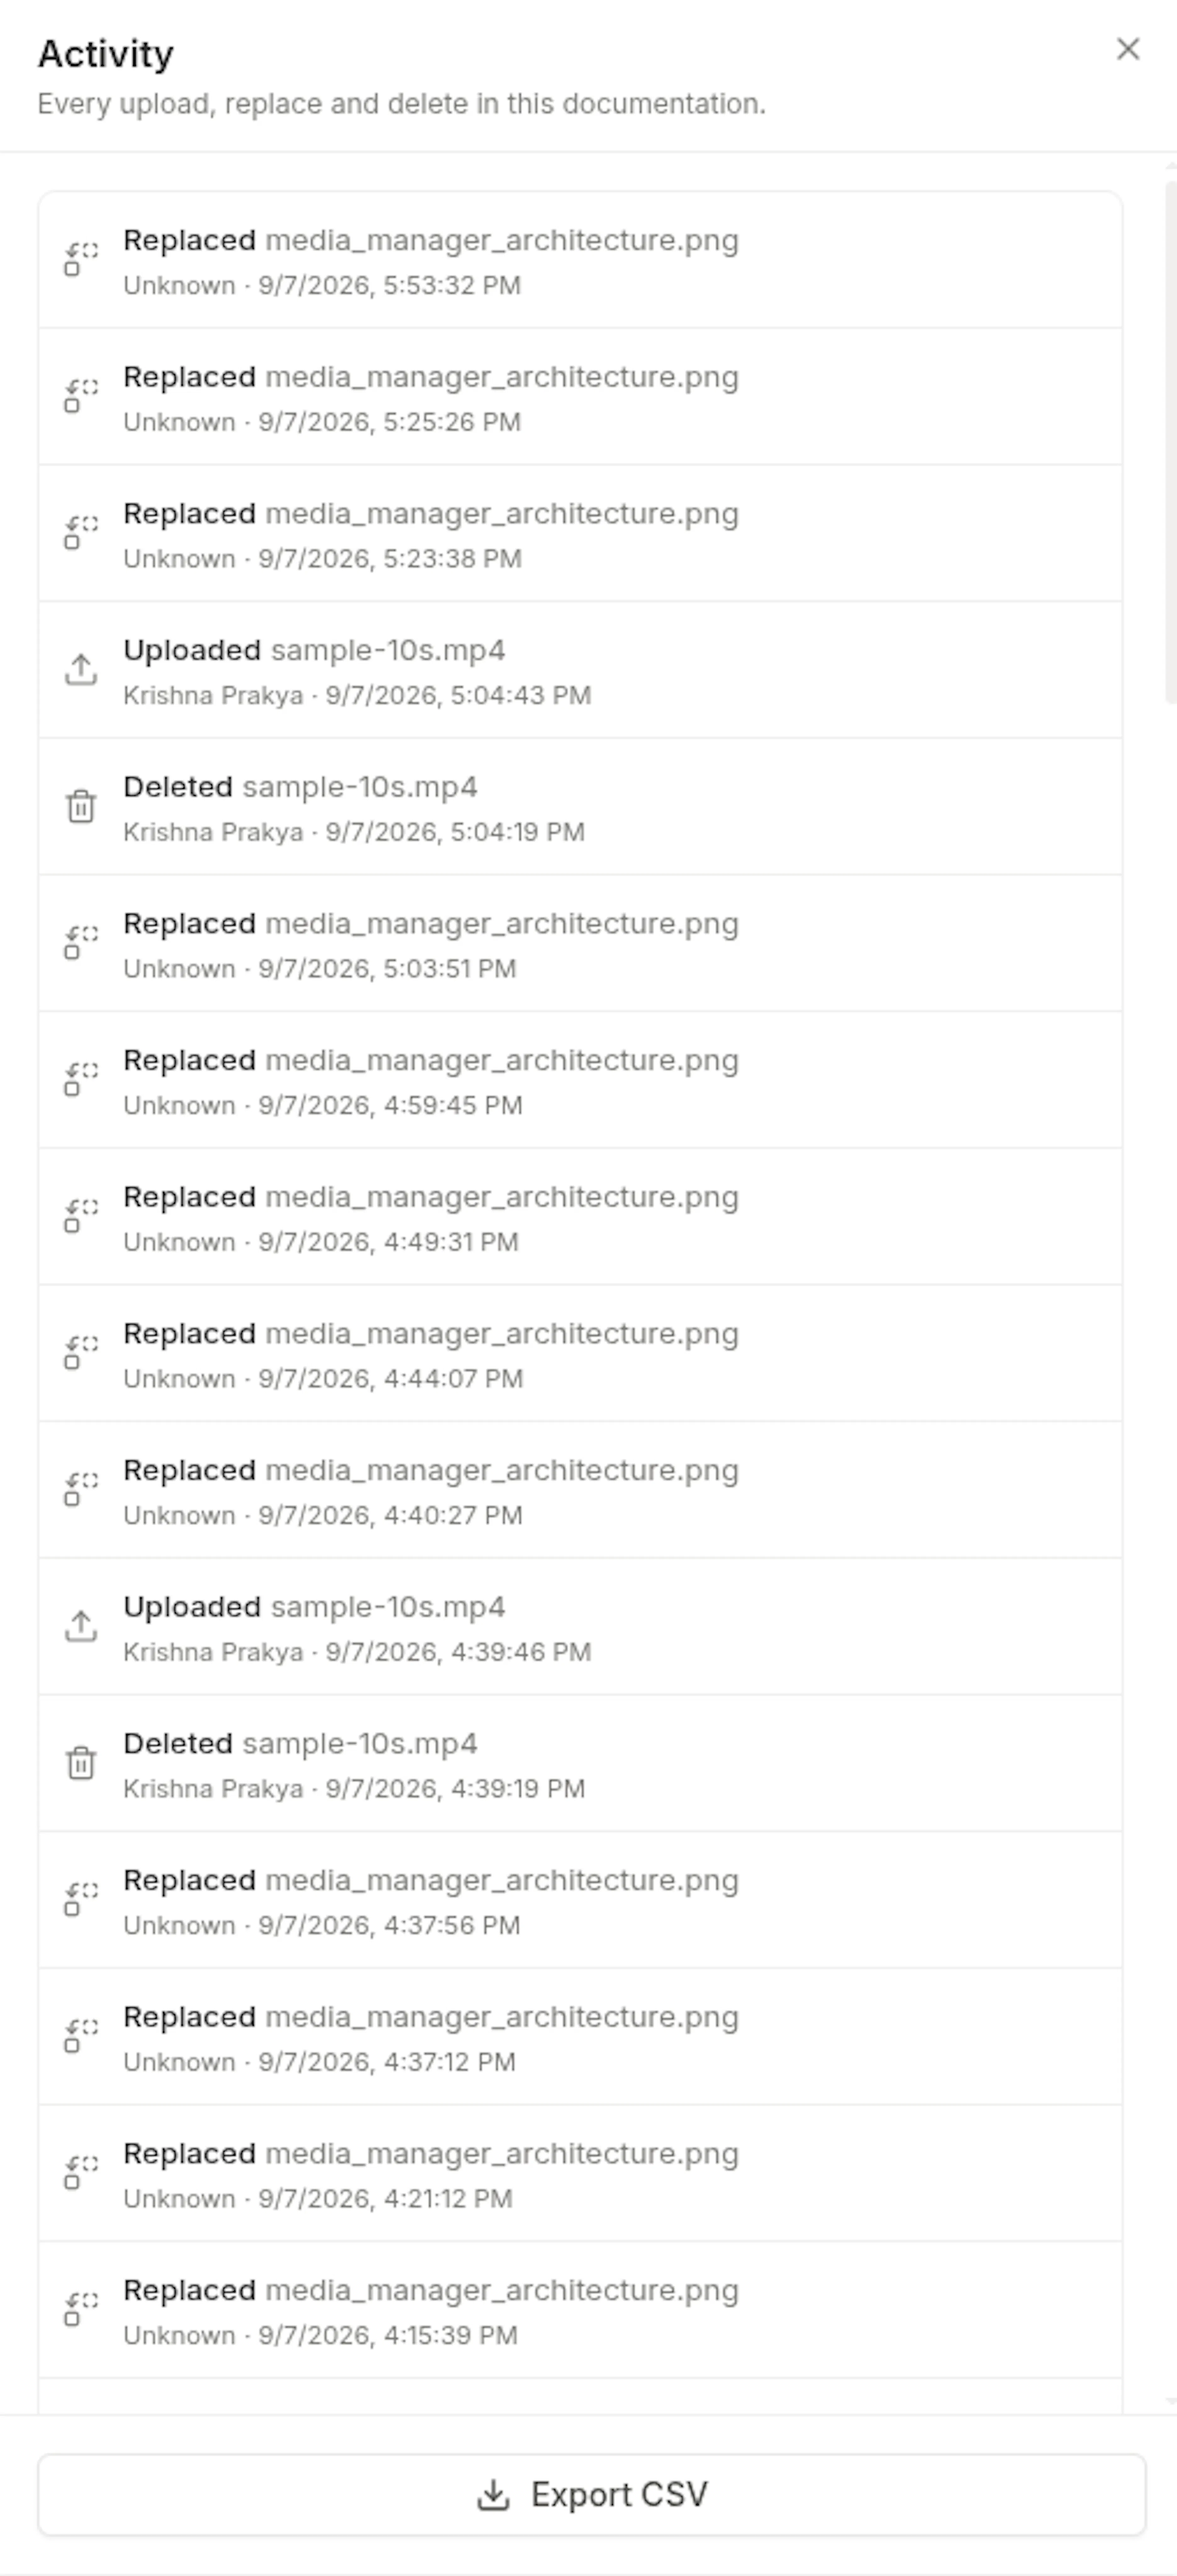
How to see who uploaded, replaced, or deleted a file
You must be an organization admin.
- Open the Media library window from the Media tab.
- Click Activity in the bottom bar. Each entry shows the action, the file, the person, and the time.
- If you need the list outside the dashboard, click Export CSV.
Code editor (Git)
Media files are not committed to your repository. You upload them in the dashboard, then reference their URLs in .mdx files. For the branch and pull request flow around those edits, see Code editor.
How to get a file's URL
- Open the documentation in the web editor and select the Media tab.
- If the file is not there yet, click Upload media and add it. You do not need to insert it into a page.
- Hover the tile and click Copy URL.
How to add an image or file in MDX
Paste the URL into the component that matches the kind of file. These are the same snippets the web editor writes.
If you want an image:
<Image
  src="https://blob-cdn.documentation.ai/org-53a37986-2c9e-4094-b9e8-1e1ffae9e9ee/doc-b389b141-ae58-4fd5-91f9-6702fae9ac58/1788844659125-k7m4msitaol-media-tab-hover-actions.png"
  alt="Media tab in the web editor with a hovered tile"
  width="572"
  height="505"
/>
Renders as:
If you want readers to open or download a file, write a Markdown link:
[Open the demonstration (PDF)](https://file-cdn.documentation.ai/org-53a37986-2c9e-4094-b9e8-1e1ffae9e9ee/doc-b389b141-ae58-4fd5-91f9-6702fae9ac58/1788846660209-arams5u6ft-demonstration.pdf)
Renders as:
Commit and push as usual. The file is already hosted, so it renders as soon as the build completes. For all props, see Images and Files. For video, see Videos and iframes.
How to update a file without changing your MDX
Replace it in the web editor. Open the Media tab, click the file, click Replace file, and choose the new version of the same type. The URL stays the same, so no commit is needed. See How to update a file everywhere it is used.
How to swap or remove a file
- If you want a different file, upload it, copy its URL, and change the
srcor link target in your MDX. The old file stays in the library until an admin deletes it. - If you want to remove a file entirely, delete every reference in MDX first, publish, then ask an admin to delete the file from the library.
AI agents and the REST API
AI agents connected through the Authoring MCP Server and scripts that use the REST API work with this same media library. Every file they add goes through the same checks as an upload in the web editor.
How to add an image or file with an AI agent
Put the file where the agent can reach it
If the file is at a public URL, you are ready. If it is on your computer, ask the agent for an upload link, open it, and drop the file. The link works for 15 minutes.
Ask for the file and where it goes
Give the agent the URL, or tell it you uploaded the file, then name the page and the place on the page. For example: Import https://example.com/setup-diagram.png and add it under the Install heading in guides/setup.mdx
Review and publish
The agent adds the file to the library, then inserts the same snippet the web editor writes. Review the page and publish it like any other edit.
Importing a file does not change any page on its own. If the file is already in your library, the agent reuses it. If another file already has the same name, the new file gets a number added, such as screenshot-2.png.
You can also ask the agent to find a file you already have, by name or by alt text, and use that one rather than importing another copy.
How to upload files with the REST API
You need an API key with the Editor or Admin role. See the REST API overview to create one.
If the files are on your computer or in your build, upload up to 10 in one request:
curl -X POST https://api.documentationai.app/api/v1/media \
  -H "Authorization: Bearer dai_your_api_key" \
  -F "files=@setup-diagram.png" \
  -F "files=@install-guide.pdf"
If the files are at public URLs, import them instead:
curl -X POST https://api.documentationai.app/api/v1/media/import \
  -H "Authorization: Bearer dai_your_api_key" \
  -H "Content-Type: application/json" \
  -d '{"files": [{"url": "https://example.com/setup-diagram.png", "altText": "Setup steps diagram"}]}'
The response has one result per file, each with a status of added, reused, or failed. A stored file comes back with its url and a ready-made snippet to paste into MDX, as shown in How to add an image or file in MDX. The response code is 200 when every file was stored, and 207 when only some were.
How to replace or delete a file with an agent or the API
Replacing or deleting a file takes effect right away on every page that uses it, including your live site. Only Admins can delete files, and pages that use a deleted file show it as missing.
- If you want a newer version on every page, ask the agent to replace the file from a URL, or send the new file to the API's replace endpoint. The new file must be the same type, and the URL stays the same.
- If you want to remove files, ask the agent to delete them, or use the API's delete endpoints. You can delete up to 100 files at once.
Uploads, replacements, alt text changes, and deletions made by agents and API keys appear in the Activity panel with every other change. An agent's changes appear under the name of the person who connected it, and an API key's under the key's name. See How to see who uploaded, replaced, or deleted a file.
Common questions
How to check storage usage
- Go to Settings → Organization Settings → Media Storage.
- Read Storage used for how much of your quota is in use and how much remains.
- If you are an admin and want to know which documentation uses the most space, read Usage by documentation.
For per-file size limits by plan and file type, see Limits and supported file types below.
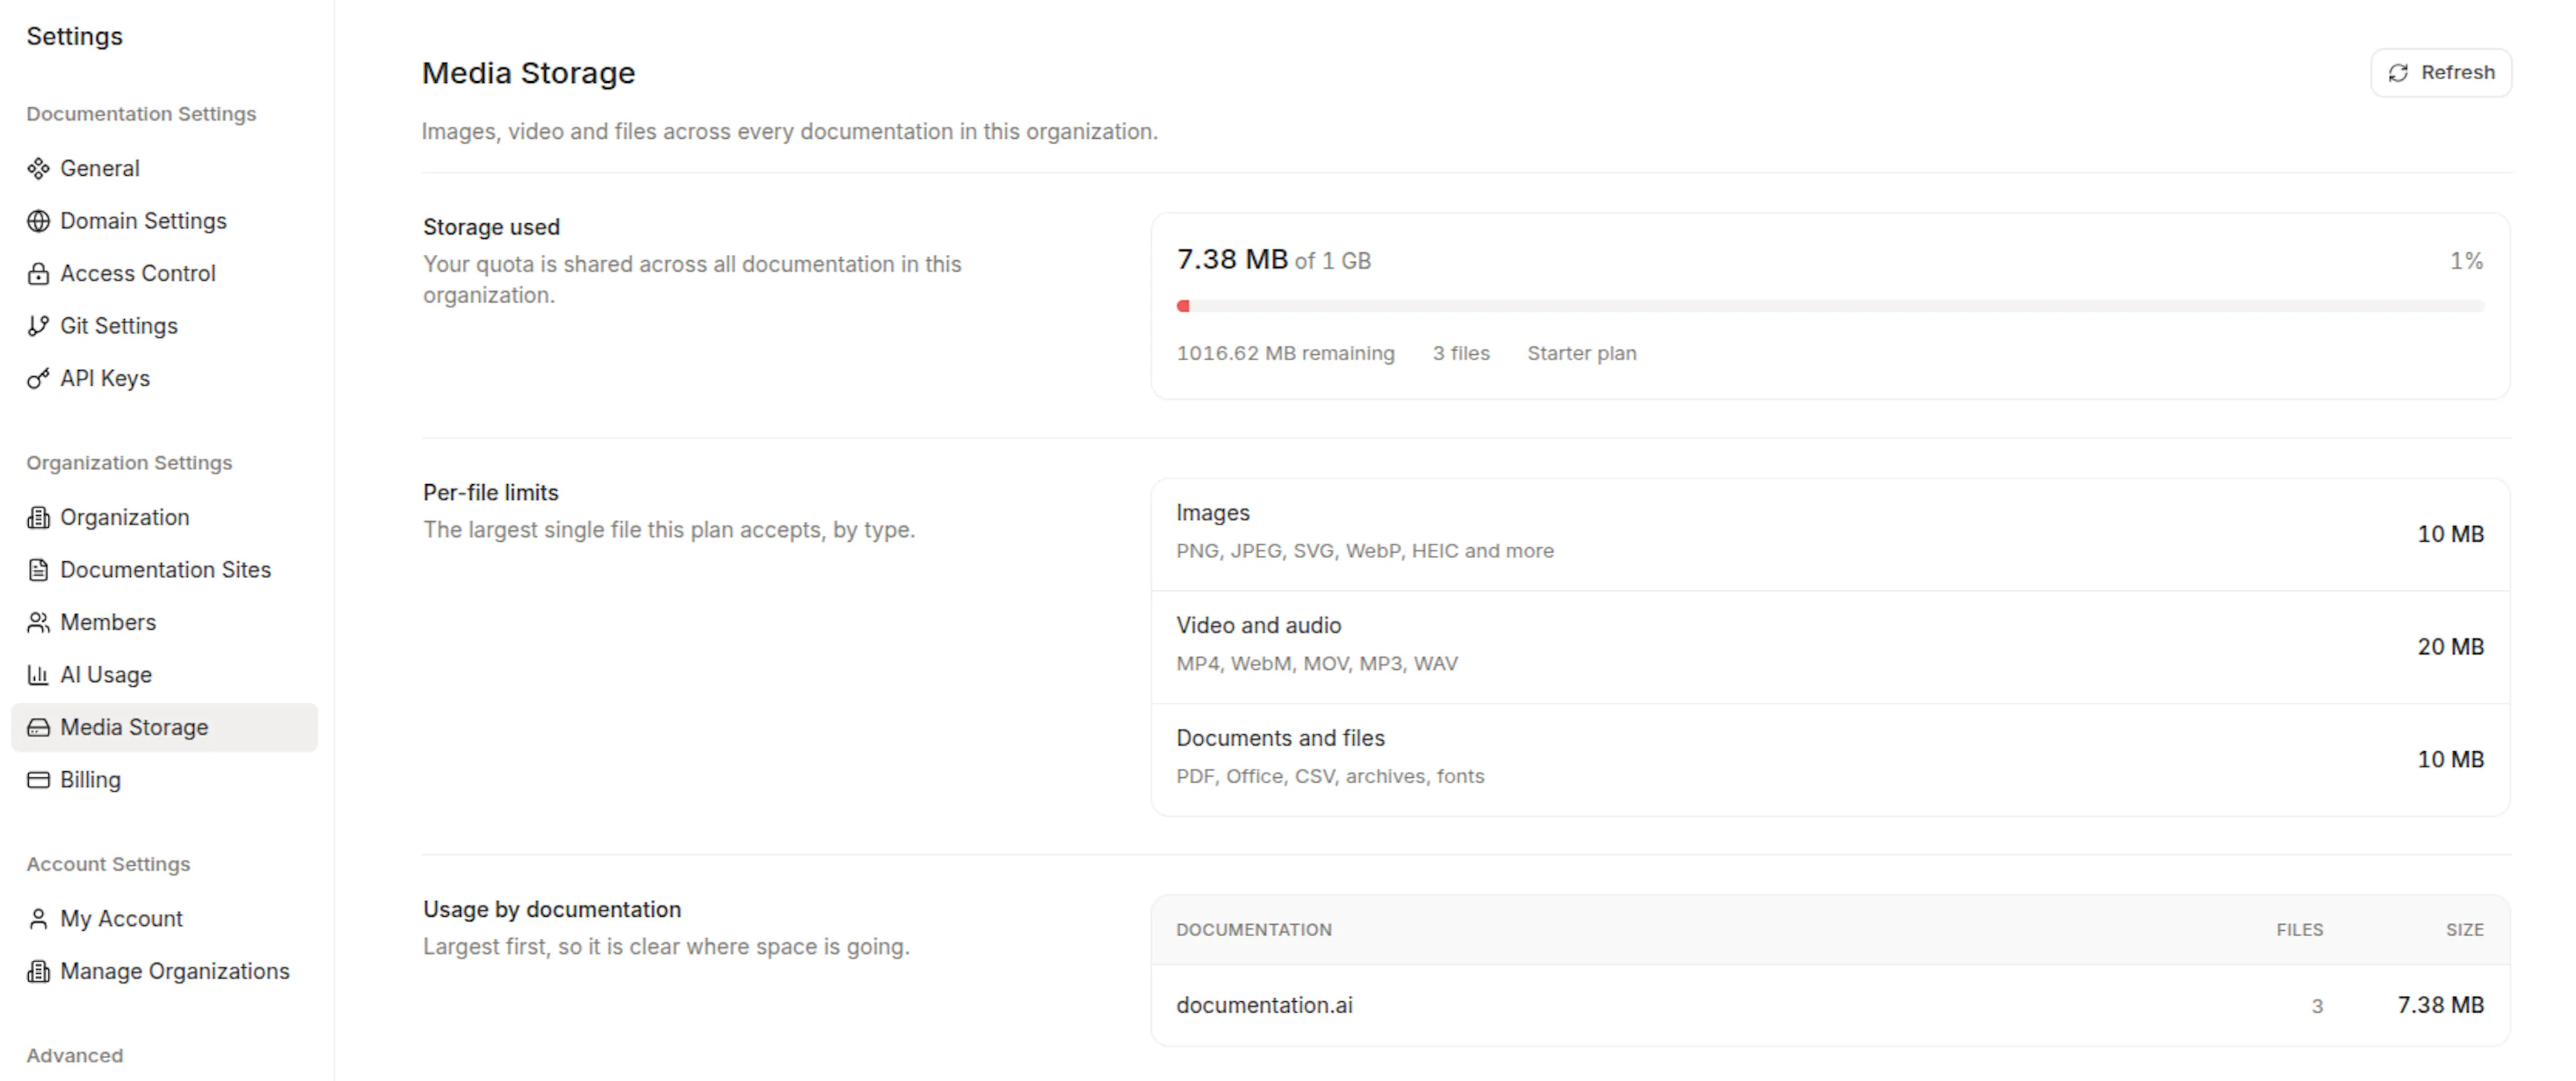
If usage is above 80%, a warning also appears in the media library. If you go over the limit, free space by deleting files or upgrade the plan. Uploads and publishing pause until you are under the limit; sites you have already published keep serving. See Limits and supported file types.
If an upload is refused
The message in the upload tray, or in the agent's or API's result for the file, tells you why. Match it below:
- "File size exceeds your plan's limit of …MB": Compress or resize the file. For video and documents, the message names the cheapest plan that accepts it.
- "Storage limit reached": Delete unused files or upgrade. See How to check storage usage.
- "The file extension of "…" does not match its content": The file is not really the type its name says. Re-export it in the intended format.
- "Files of this type cannot be uploaded": Programs, scripts, macro-enabled Office files, and HTML are never accepted. Put them in a ZIP if readers need them.
- "contains a
<script>element. Remove it and upload again, or use a PNG.": An SVG is refused when it carries something that could run in a reader's browser. The message names what was found, such as a script, an inline event handler, a<foreignObject>, an embedded document, or ajavascript:link. Remove it, or upload a PNG instead. - "Uploading … files is not available yet": Delivery for that kind of file is not enabled in your environment. Contact support.
- "A … can only be replaced by another …": Replace the file with one of the same type, or add the new file separately.
If an import from a URL fails, check the rules in Importing from a URL.
Limits and supported file types
Each plan sets a maximum size per file and a total storage quota shared by every documentation in the organization.
| Plan | Total storage | Images | Video and audio | Documents and files |
|---|---|---|---|---|
| Starter | 1 GB | 10 MB | 20 MB | 10 MB |
| Standard | 5 GB | 10 MB | 30 MB | 20 MB |
| Professional | 20 GB | 10 MB | 50 MB | 30 MB |
| Enterprise | 100 GB | 10 MB | 50 MB | 30 MB |
AppSumo Tier 1 and Tier 2 use the Standard limits. AppSumo Tier 3 and Tier 4 use the Professional limits. Images are capped at 10 MB on every plan.
| Kind | Formats | Size limit column |
|---|---|---|
| Images | JPEG, PNG, GIF, WebP, SVG, ICO, HEIC/HEIF, AVIF, BMP, TIFF | Images |
| Video | MP4, M4V, WebM, MOV | Video and audio |
| Audio | MP3, WAV, OGG, M4A, AAC | Video and audio |
| Documents | PDF, DOCX, DOC, XLSX, XLS, PPTX, PPT, ODT, ODS, ODP | Documents and files |
| Data | CSV, TSV, JSON, YAML, XML, TXT, LOG, MD, MDX | Documents and files |
| Archives | ZIP, GZ, TGZ, TAR | Documents and files |
| Fonts | WOFF, WOFF2, TTF, OTF | Documents and files |
Never accepted, on any plan: programs and installers (.exe, .msi, .dmg, .apk, .jar), scripts (.js, .sh, .ps1, .bat), macro-enabled Office files (.docm, .xlsm, .pptm), and web pages (.html, .htm). Uploads are verified on the server: the file's contents must match its extension, and SVG files containing scripts or embedded documents are rejected.
Importing from a URL
AI agents and the REST API can import a file from a URL when:
- The URL starts with
https://. - The file opens without signing in. Addresses on private networks are refused.
- The URL redirects no more than 3 times.
- The file finishes downloading within 30 seconds.
- The file is within your plan's size limit for its kind.
A file whose name is already taken gets a number added, such as screenshot-2.png, wherever it is uploaded from. A file that is already in your library is reused rather than stored again.
Files per request
| Action | Maximum files |
|---|---|
| Upload with the API | 10 |
| Import from URLs with an agent or the API | 10 |
| Delete with an agent or the API | 100 |
| Delete in the web editor | No limit |
Agents and the REST API can store up to 120 files a minute for each organization. Past that, a file is refused with a 429 response that says how many seconds to wait. An upload link works for 15 minutes.
Related
Images
Component props, supported formats, and sizing for the Image component.
Videos and iframes
Embed uploaded videos or platform links with the Video and Iframe components.
Files
Link PDFs, documents, archives, audio, and fonts with the File slash command.
Web editor
Insert and manage media visually without touching Git.
Code editor
Reference media URLs in MDX and manage files alongside a Git workflow.
Authoring MCP Server
Let an AI agent import, upload, replace, and delete files for you.
REST API
Upload and manage files from scripts and CI/CD pipelines.